置頂FQ&A
Frank我有問題🙋🙋🙋
- Frank的Email: stylefk1218@gmail.com
- Frank的Line: stylefk
從Hugging face下載model@@@@改成直接從civiai 複製下載連結然後wget “連結” -O “asdas.safetensors”
使用wget下載model
1. 打開一個新的”Terminal” 點擊 “+”
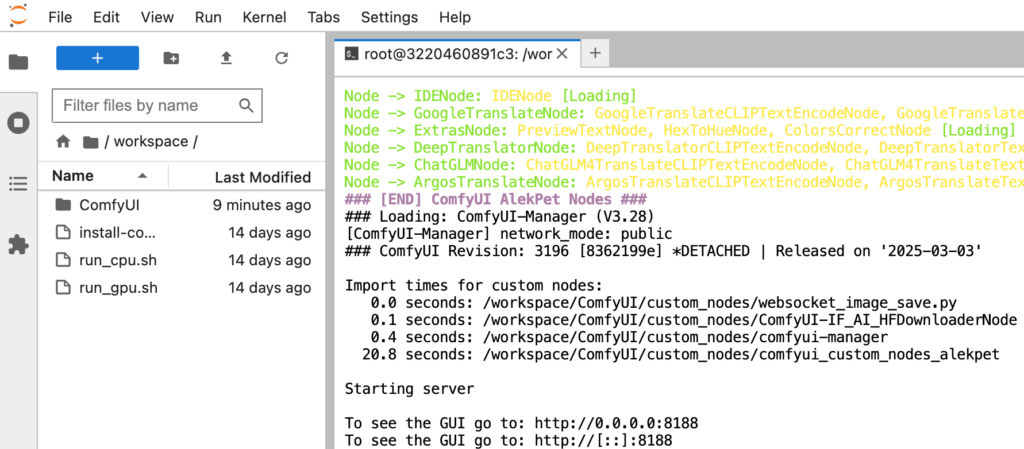
2. 點擊 “Terminal”
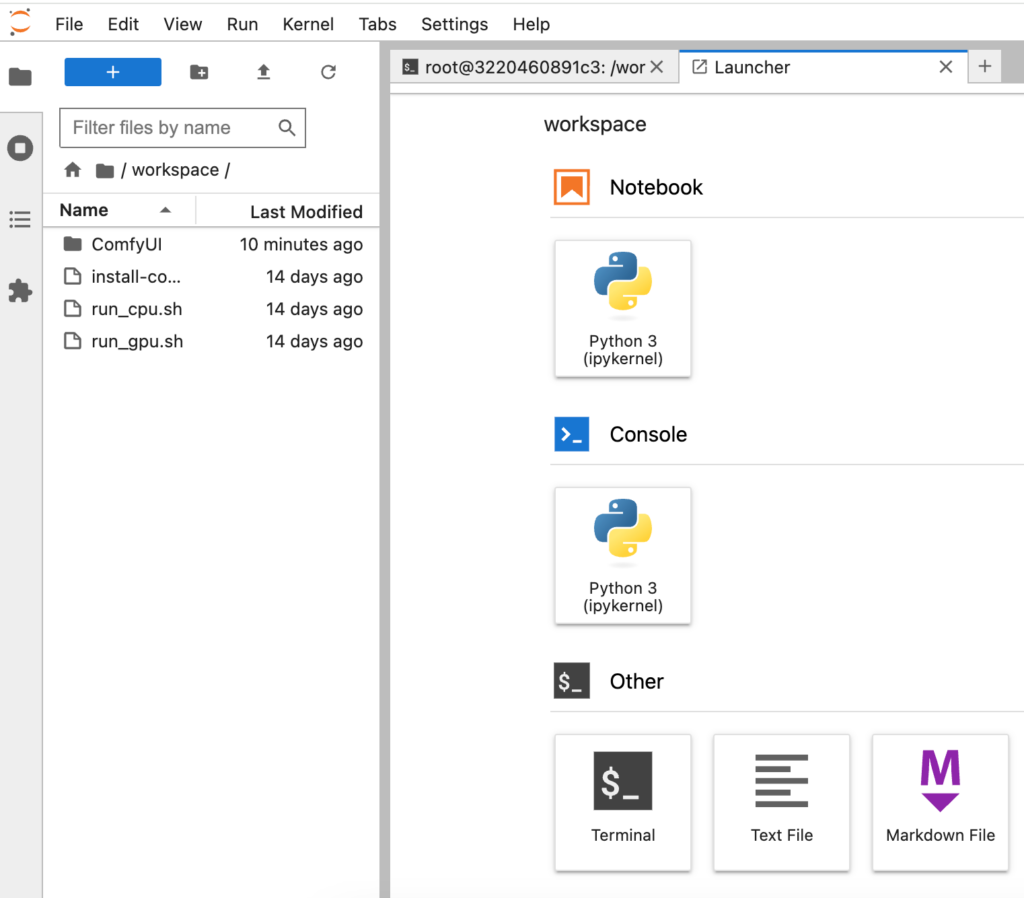
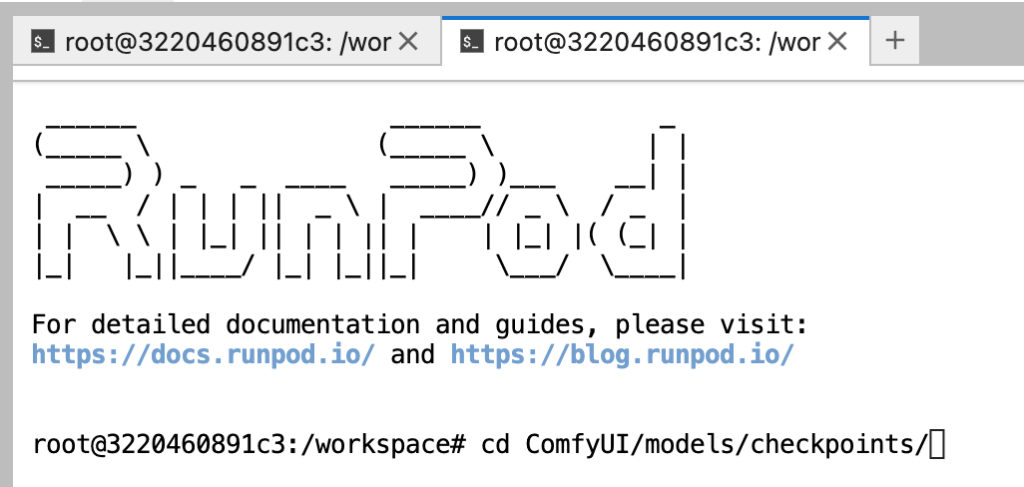
3. 輸入 “cd ComfyUI/models/checkpoints/” 然後 “enter” -> 注意model應該要放到的位置,例如是checkpoints就放在checkpoints裡面、是controlnet就放在controlnet裡面
4. https://huggingface.co/ 搜尋你想要的模型例如 “realisticVisionV60B1_v51VAE” 在 “https://huggingface.co/moiu2998/mymo/blob/3c3093fa083909be34a10714c93874ce5c9dabc4/realisticVisionV60B1_v51VAE.safetensors” 裡面
5. 進入連結後點擊 “Copy download link”

6. 輸入 “wget xxxxxxxxx” 安裝下載模型 (xxxx為複製後的連結)

7. 輸入 “ls” 確認是否有”realisticVisionV60B1_v51VAE.safetensors”

快捷鍵
- ctrl+enter: queue
- ctrl+B: bypass
- ctrl+M: ignore the workflow after this node
- ctrl+c/ctrl+shfit+v: 包含接線複製
Tips
- 如果沒出現效果,修改提示詞的權重
ComfyUI-Manager內下載model/node
只要是node都要restart
1. 點擊右上方”Manager”

2. 選擇”Custom Nodes Manager” or “Model Manager”
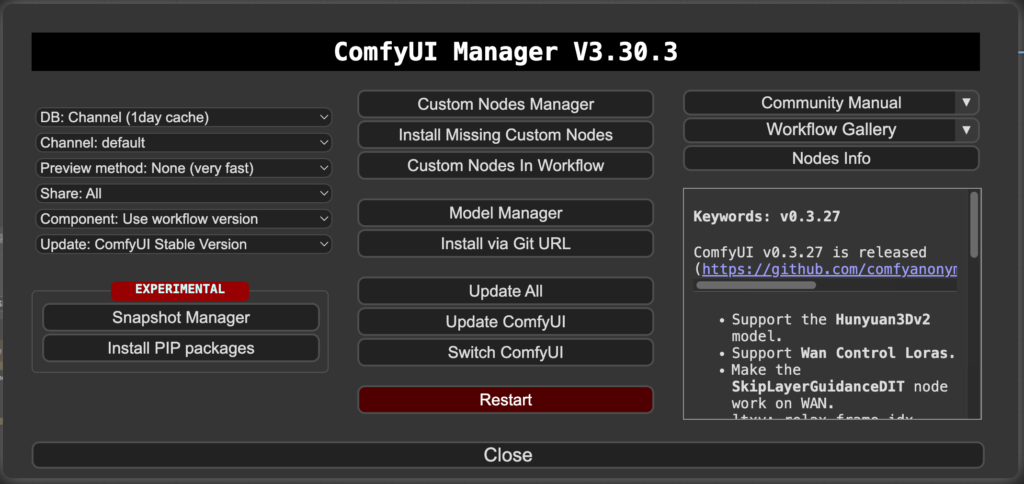
3. 搜尋並下載相關的node/model
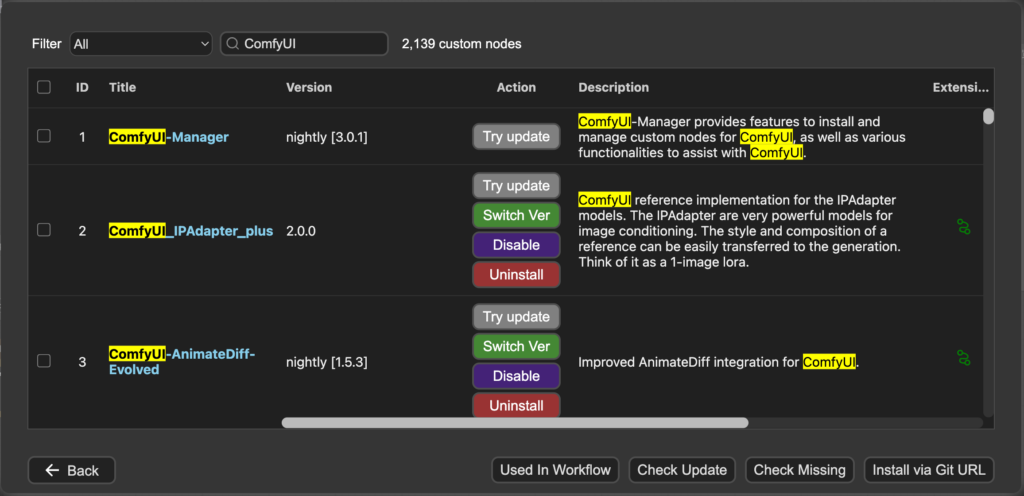
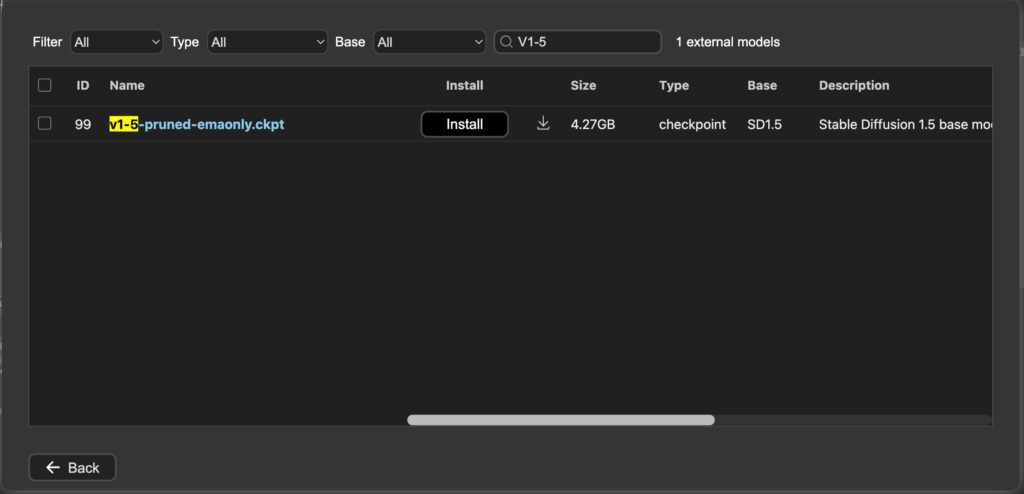
4. 下載完”非系統的檔案“後會需要”Refresh”

->可直接點擊重新整理->

4. 下載完”系統的檔案“後會需要”Restart”,重開機後再”Refresh”

->等待ComfyUI重啟後重新整理->

5. 下載完成👍👍👍
❗開啟RunPod
1. 點擊Storage內創好的Pod的 “Deploy”
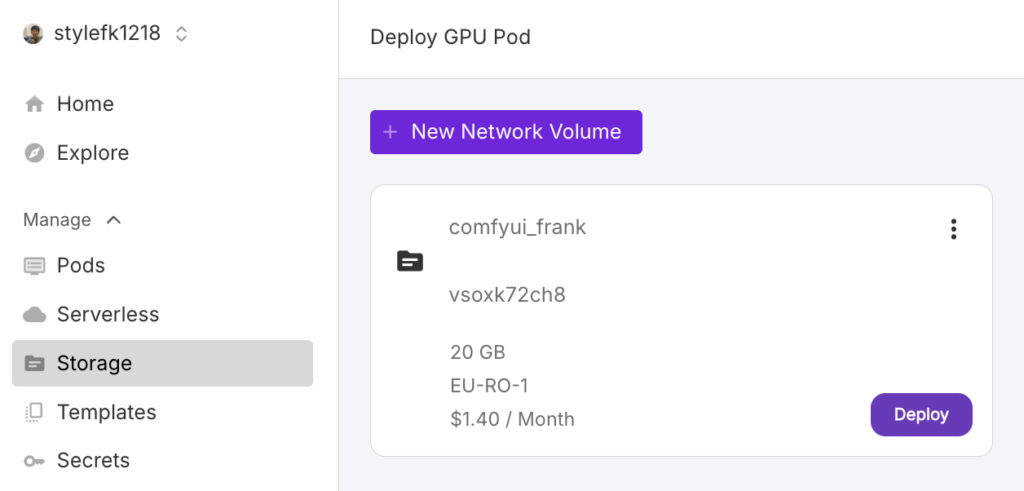
2. 選擇你要的GPU->會影響到租用的價格,若非大量使用選擇”16GB VRAM”即可,若錢太多,請選擇最貴的那種
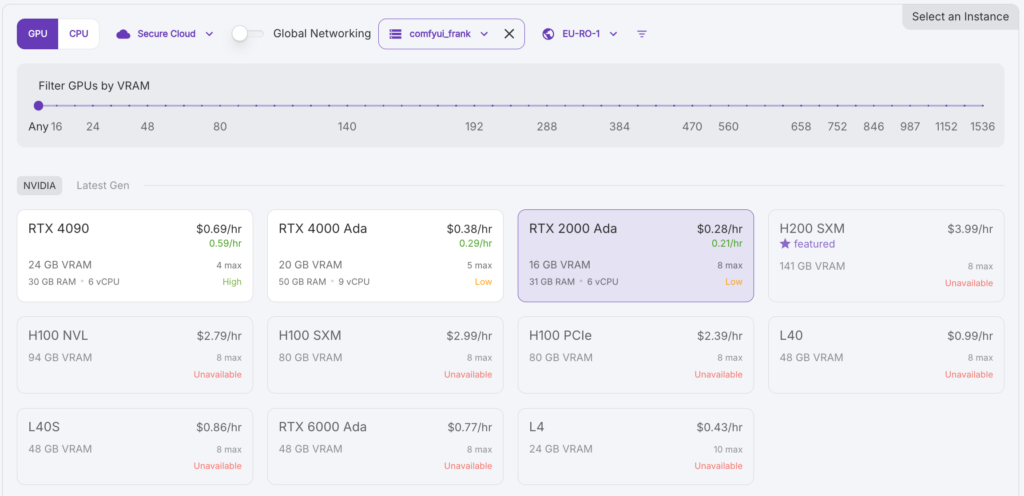
3. 滑到最下方點擊 “Deploy On-Demand”

4. 等待系統啟動並點擊 “Connect”
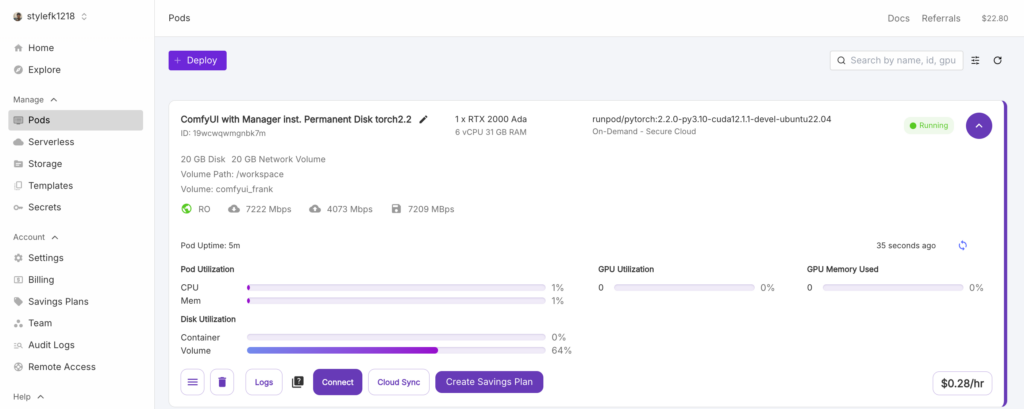
5. 無論是否Ready都可以點擊 “Jupyter Lab -> :8888”

6. 點擊”Terminal”
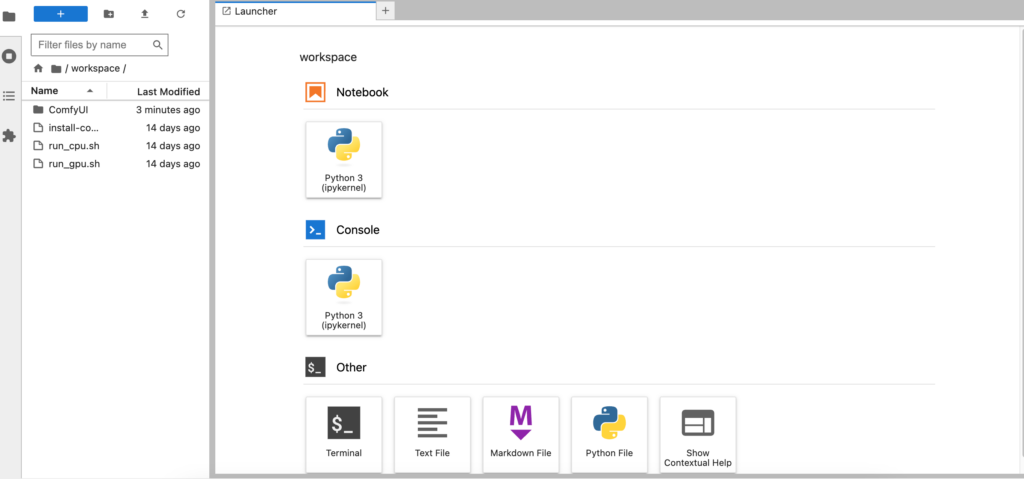
7. 打 “./run_gpu.sh” and press “enter”
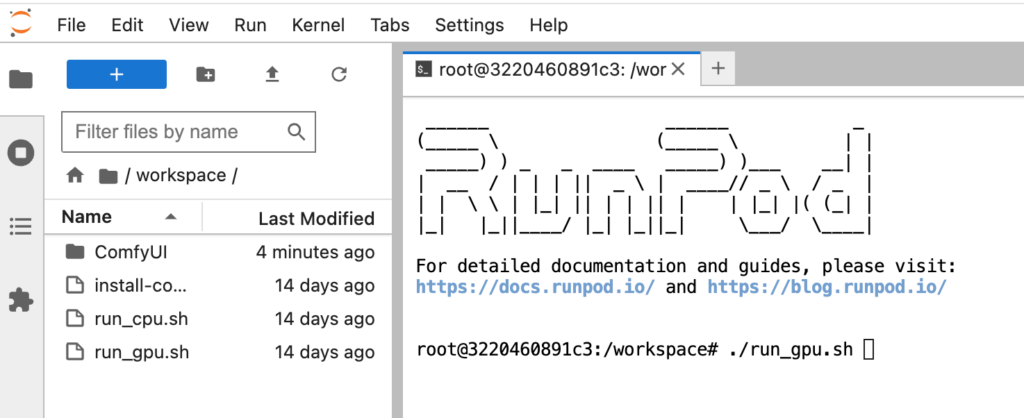
8. 等待伺服器建立,直到出現“http://0.0.0.0:8188”

9. 回到 “Connection Options” 點擊 “HTTP Service -> :8888”

10. 打開 ComfyUI 代表成功!
❗關閉RunPod
1. 回到RunPod 點擊 “垃圾桶”
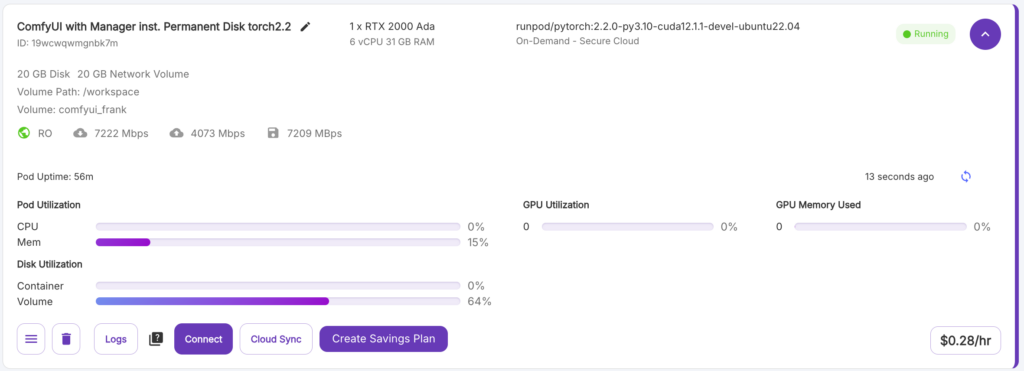
2. 點擊 “Yes”

3. 重新整理並檢查是否成功關閉

【遠距教學】“0”基礎也能學會的AI繪圖-授課大綱
課程大綱(依實際情況異動)
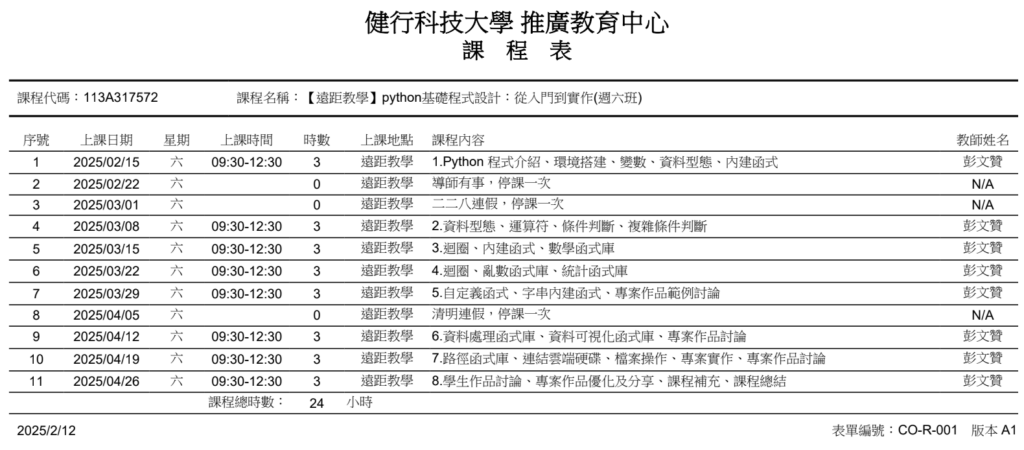
【遠距教學】“0”基礎也能學會的AI繪圖-授課時間
時間規劃:
| 時間 | 項目 |
|---|---|
| 8:00~9:30 | X |
| 9:30~9:45 | X |
| 9:45~11:00 | X |
| X | X |
【遠距教學】“0”基礎也能學會的AI繪圖
Lesson_01
授課大綱:
| 課程內容 | 項目 |
|---|---|
| 1. About ME & YOU | – |
| 2. 課程介紹 | -課程概況 -課程目標 -課程專題 |
| 3. AI? What/How/Why | -AI是什麼? -AI怎麼工作? -為什麼需要AI? -生成式AI & 判別式AI -Too many AIssssssss |
| 4. Comfyui/Webui/Forgeui | -AI繪圖平台-Comfyui/Webui/Forgeui比較表 |
| 5. 部署AI工作環境 | -註冊/付錢(Pay As You Go) -安裝雲端電腦、工作環境、ComfyUI |
| 6. AI的工作環境 | -什麼是GPU?為什麼我們需要GPU? -CPU?GPU?NPU?MCU?UUUUUUU? -GPU 製造商? -GPU要放在哪? -Cloud(雲端)的平台 -什麼是Terminal?@@@@@ -什麼是Server? -我們和ComfyUI的關係 |
| 7. 秒懂AI生成圖片流程 | -AI怎麼生成圖片的? |
| 8. task_0-first_attempt.json⮕人生第一張自己創造的AI繪圖 | -下載模型:”v1-5-pruned-emaonly.ckpt”->請參考置頂FQ&A -生成第一張AI繪圖 -儲存工作流(workflow) |
| 9. ❗關閉RunPod | -請參考置頂FQ&A |
1. About ME, YOU and PYTHON
2. 課程介紹
課程概況:
- 課程名稱:【遠距教學】“0”基礎也能學會的AI繪圖
- 對象:對影像生成式AI有興趣的任何人
- 授課條件:一點點英文能力
- 雲端租用GPU費用:1000以內
- 學習心態:
- Traching: Lecturer teaches the flows/nodes/components for the results.
- Practicing: Based on what you want. No memorizing, but more exercising.
- Sharing: Not just input from lecturer because AI can produce by your mind.
課程目標:
- AI繪圖概念解析
- AI作圖與提示詞技術
- AI圖像生成與編輯
- AI個人繪圖工作流建立
- AI風格訓練與自訂模型
- AI圖像後製與強化
- AI繪圖的商業應用
課程專題:
- 最後兩堂課會和同學討論要做什麼樣的專題,並給同學時間展示。
3. AI What/How/Why?
什麼是AI?

Artificial Intelligence(人工智慧):
-貓為什麼是貓?狗為什麼是狗?
-學習是什麼?為什麼要學習?
-AI是不是人?人是不是AI?
-AI突然出現?你會不會被AI取代?
AI怎麼工作?

看你腦子好不好:
-擁有好大腦(model)
-問題來了(input)
-做出判斷、行動(output)
為什麼需要AI?

人性:
-懶
-懶
-懶
生成式AI & 判別式AI

Generative AI vs Discriminative AI
THESE CAN BE ANYTHING!
Too many AIssssssss
TEXT to TEXT -> ChatGPT, Claude, Gemini, LLaMA…
TEXT to IMAGE -> Stable Diffusion, DALL-E, Midjourney, Imagen…
TEXT to MUSIC -> Stable Audio, Suno, MusicGen…
TEXT to VIDEO -> Stable Video Diffusion, Sora, Imagen Video…
4. Comfyui/Webui/Forgeui
AI繪圖平台-Comfyui/Webui/Forgeui比較表
| 功能/特性 | Comfyui🎖️ | Webui | Forgeui |
|---|---|---|---|
| 操作方式 | 節點式(Node-based),自由組合運算流程🎖️ | 按鈕+滑桿,類似一般應用 | A1111 的改進 UI,更直覺 |
| 使用難度 | 高(適合進階用戶) | 低🎖️ | 低🎖️ |
| 安裝難度 | 高(適合進階用戶) | 低🎖️ | 低🎖️ |
| 速度 | 速度取決於節點設計 | 標準速度 | Webui 優化版 |
| 可擴充性 | 極高(可自由組合不同模型、VAE、Lora)🎖️ | 高(支援多種插件) | 高(兼容 A1111 的插件) |
| 運算流程自由度 | 非常高(可自訂完整 Workflow)🎖️ | 一般(參數設定後出圖) | 一般(與 A1111 相同) |
| UI/UX 體驗 | 複雜但靈活 | 普通,介面較傳統 | 現代化 UI,體驗較順暢 |
| 適合對象 | 進階用戶、研究者 YES, YOU ARE!!!!! | 新手 & 一般使用者 | 想要更好 UI 體驗的 WebUI 使用者 |
- 哪一個是Comfyui/Webui/Forgeui?
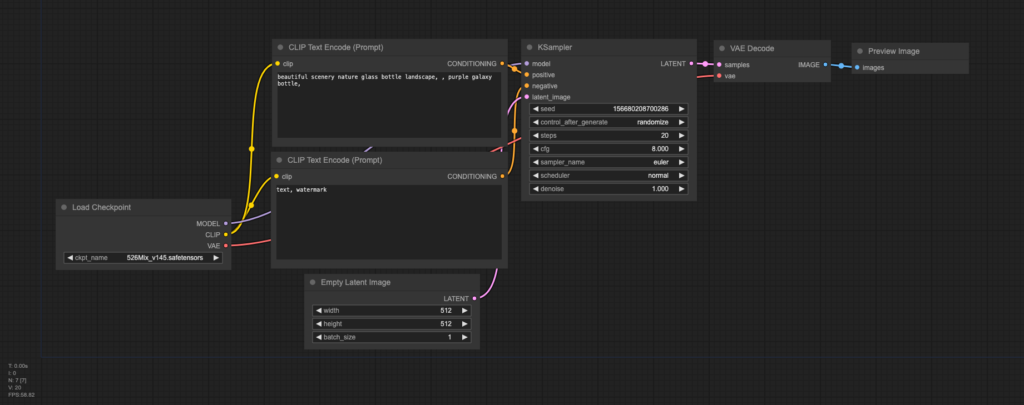
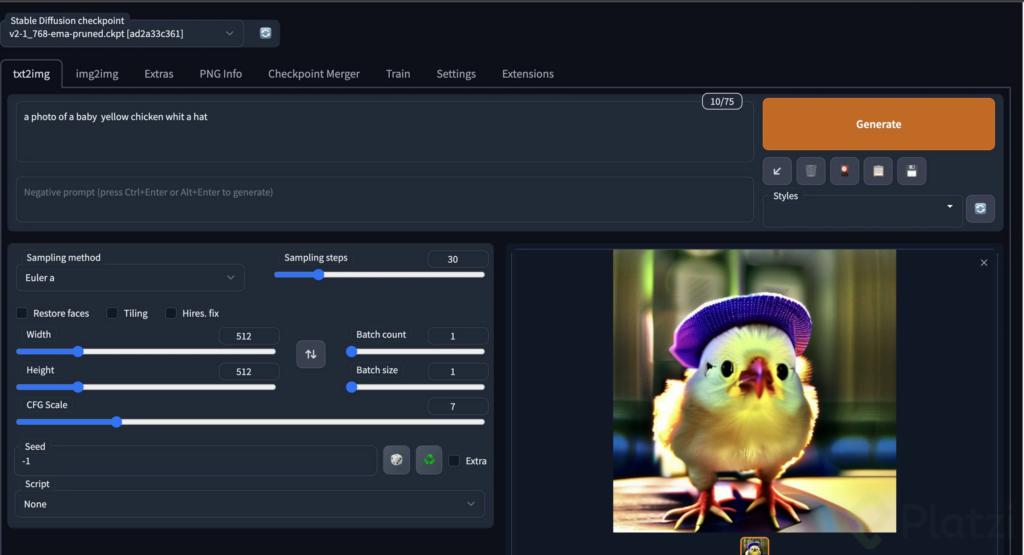
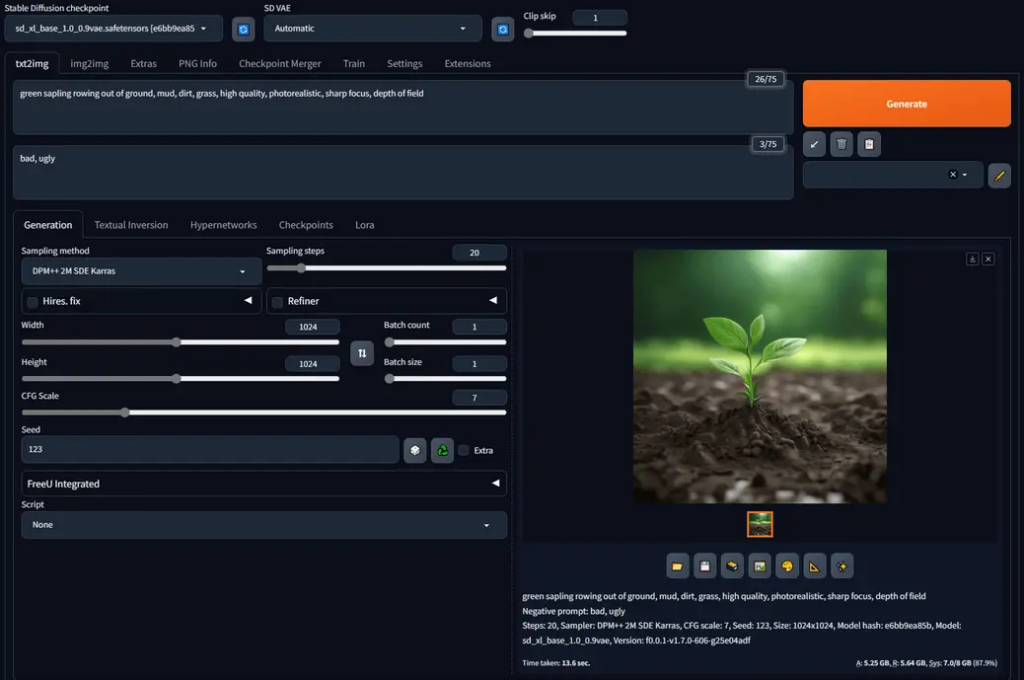
- ComfyUI就像是簡答題、WebUI/ForgeUI就像是填空題、選擇題
- ComfyUI效率好很多2倍以上
5. 部署AI工作環境
註冊/付錢(Pay As You Go)
1. https://www.runpod.io/ and 點擊 “Login”

2. 點擊 “Continue with Google”

3. 選擇你的帳號

4. Google 登入

5. Google接收驗證碼 and 點擊 “Get Started”

6. 點擊右上角 “$0.10”

7. 信用卡付錢


8. 看到錢錢變多就代表成功了!

安裝雲端電腦、工作環境、ComfyUI
1. 在RunPod頁面上點擊 “Explore” 以及搜尋 “comfyui with manager” 並點擊 “ComfyUI with Manager inst. Permanent Disk torch2.4”
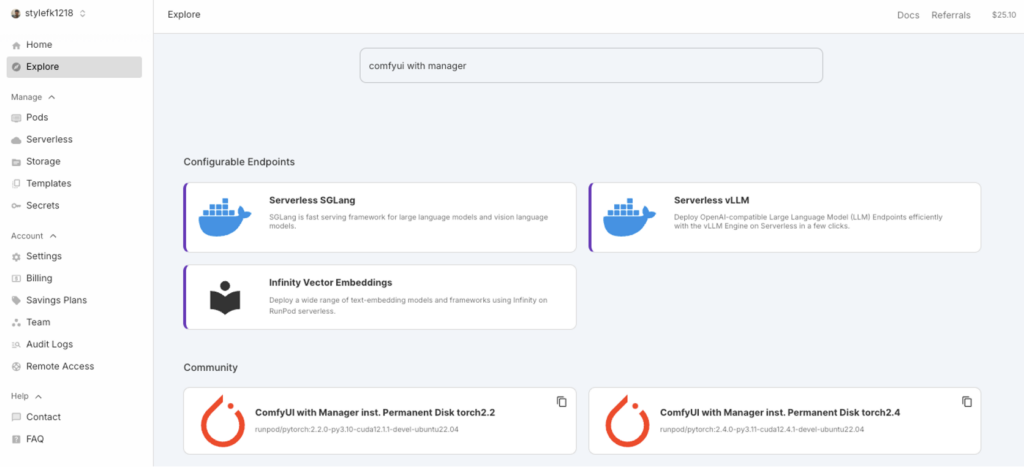
2. 點擊 “Deploy”

3. 點擊 “Network Volume” 以及 “+ Network Volume”

—>

4. 選擇存儲地點 “EU-RO-1”, 設定Volume Name, 容量 “20GB” 以及點擊 “Create”

5. 點擊 “Storage” 以及剛剛創建的Pod 的 “Deploy”

6. 選擇想要用的GPU, 這邊先選擇”RTX 2000 Ada”

7. 填寫完”Pod Name”後 選擇 “On-Demand”

8. 點擊 “Deploy On-Demand”

9. 等待部署並等到 “Pods” 出現剛剛建立的工作環境後點擊 “Connect” # 若轉圈圈後沒出現的話, 可以重新刷新頁面
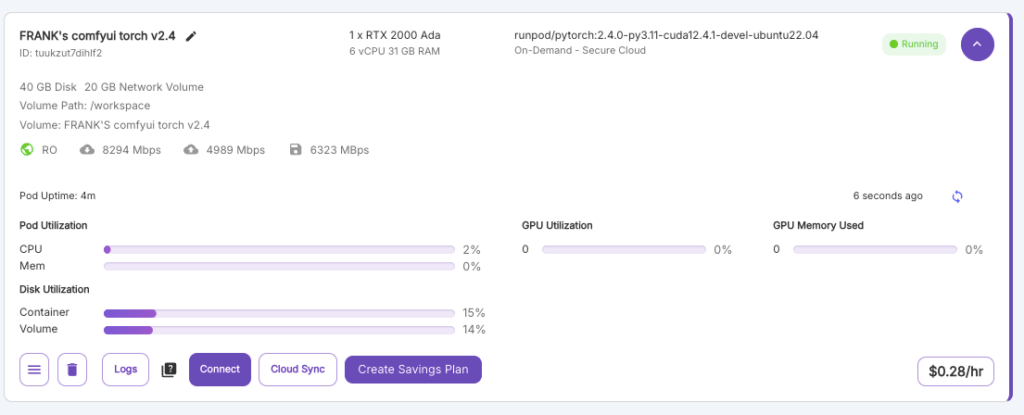
10. 無論是否Ready都可以點擊 “Jupyter Lab -> :8888” # 第一次部署都會比較久,需要安裝必要驅動或程式,請等待約10分鐘左右

11. 點擊”Terminal”

12. 打 “./run_gpu.sh” and press “enter”

13. 等待伺服器建立,直到出現“http://0.0.0.0:8188”

14. 回到 “Connection Options” 點擊 “HTTP Service -> :8188”

15. 打開Comfyui後表示成功!並點擊 “圖像生成
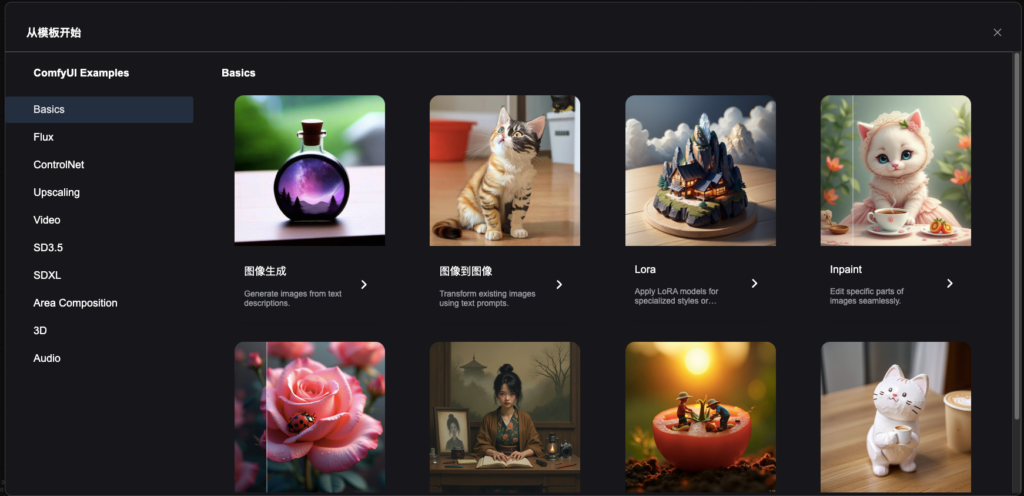
16. 點擊 “X”

17. 看到模板workflow代表成功!

6. AI的工作環境
什麼是GPU?為什麼我們需要GPU?

什麼是GPU?:
-你的感覺

-你的連結

- 10個教授 vs 1000個國中生
CPU?GPU?NPU?MCU?UUUUUUU?

就像是你的專長
每個人都有自己的專長!
GPU 製造商?

WHO MADE IT?:
GPU要放在哪?

GPU的家:
-Local(本地):你面前的電腦(啊就不夠力齁)
-Cloud(雲端): 要多兇有多兇、Pay As You Go、$
Cloud(雲端)的平台
| 特性 | RunComfy | RunPod | FastAI |
|---|---|---|---|
| 服務類型 | 即時的 ComfyUI 環境 | 用戶可部署自己的 ComfyUI 環境 | 用戶可部署自己的 ComfyUI 環境 |
| 價格 | 貴 | 適中 | 適中 |
| 難易度 | 易 | 適中 | 適中 |
| 對象 | 需要即時使用 ComfyUI,且不想進行技術配置的用戶 | 願意自行部署和管理 ComfyUI 的用戶 | 願意自行部署和管理 ComfyUI 的用戶 |
———–>


什麼是terminal?
什麼是Server?

Server就是一台電腦…
你的電腦、公司的電腦、雲端的電腦…
只是可以存比較多東西和可以提供使用者調用功能
提供服務的地方, 像是Youtube, Google……
7. 秒懂AI生成圖片流程
AI怎麼生成圖片的?

付錢獲得電腦雲端資源:
-GPU, CPU, STORAGE
-安裝必要軟體ComfyUI

訓練訓練訓練:
-大數據$$$
-演算法$$$
-模型$$$
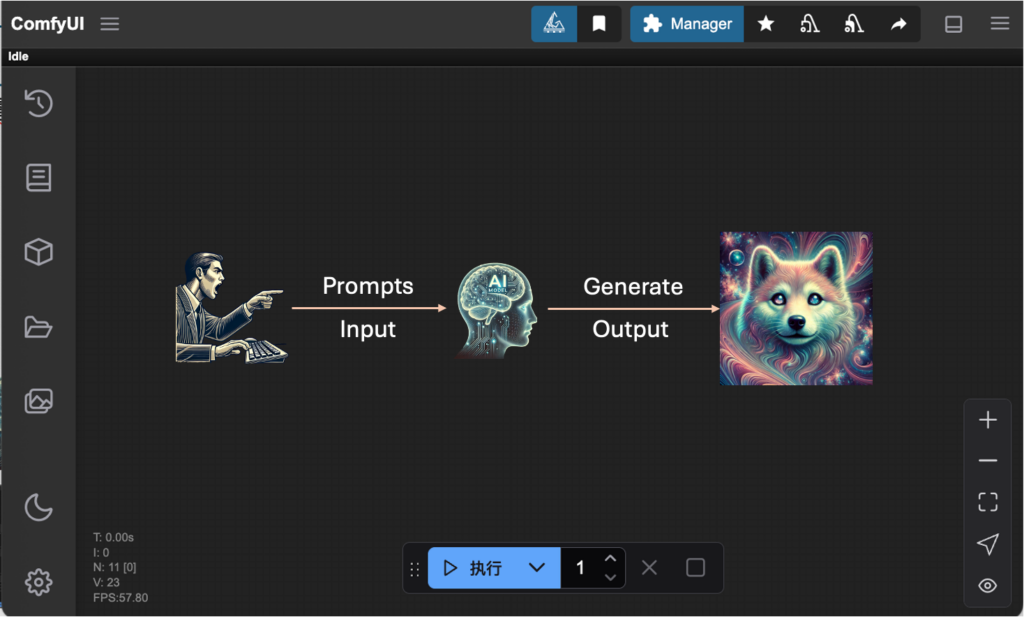
當個慣老闆:
-給你提示(Prompts)
-AI生成圖片
8. task_0-first_attempt.json⮕人生第一張自己創造的AI繪圖
下載模型:”v1-5-pruned-emaonly.ckpt”->請參考置頂FQ&A
生成第一張AI繪圖
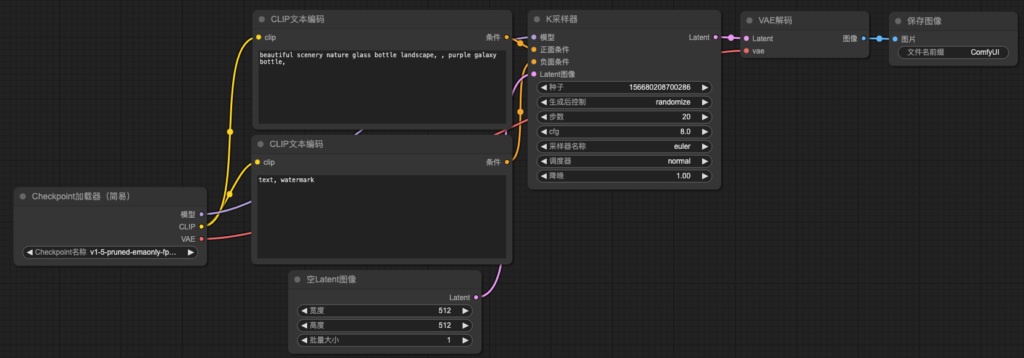
1. 修改”Checkpoint加載器” 的model 為 “SD1.5/v1-5-pruned-emaonly.ckpt” 並點擊 “Queue”
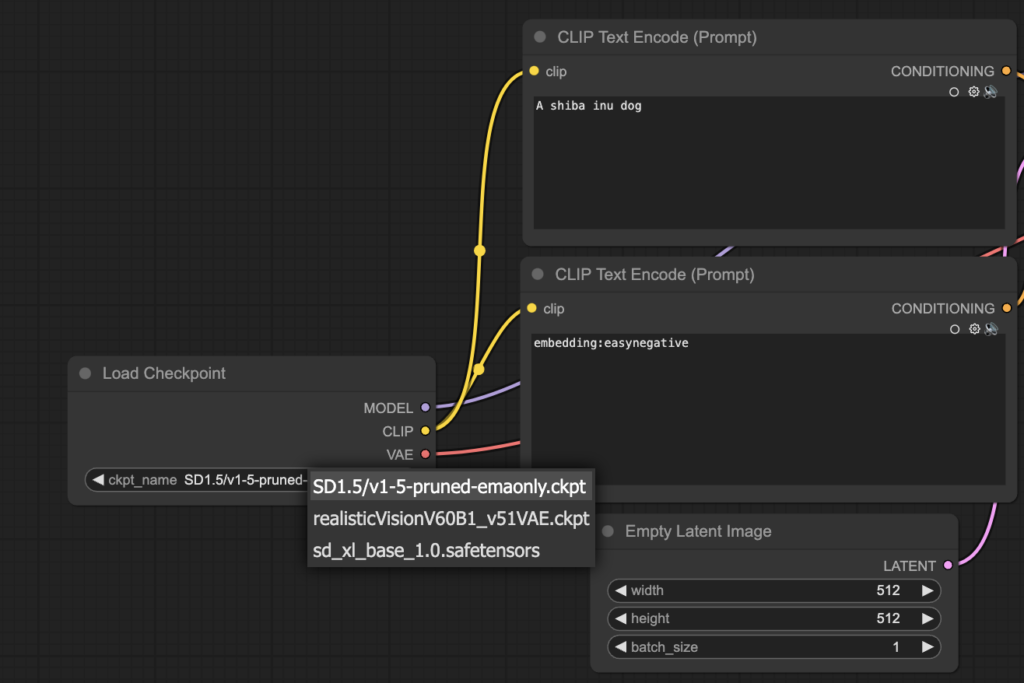
2. YOT GOT IT AND HAVE BRIEF FUN!

儲存工作流(workflow)
1. 點擊 “Workflow” -> “Save” -> “task_1-first_attempt” -> “Confirm”

->

9. 關閉RunPod❗
請參考置頂FQ&A
Lesson_02
授課大綱:
| 課程內容 | 項目 |
|---|---|
| 0. ❗開啟RunPod | -請參考置頂FQ&A |
| 1. 補充知識 | -程式碼開源、閉源? -License? |
| 2. Stable Diffusion 故事 | -Stability AI -Stable Diffusion時間軸 |
| 3. Stable Diffusion 原理 | -名詞解釋 -Text2Img |
| 4. Text2Img文生圖 | -ComfyUI工作流(workflow) -常用節點(Node) -修改ComfyUI語言 |
| 5. Text2Img task_1-basic_workflow_practice.json⮕從頭搭建工作流 | -Connecting -下載模型:”realisticVisionV60B1_v51VAE.safetensors”->請參考置頂FQ&A |
| 6. 檔案資料夾導覽 | -檔案資料夾導覽 |
| 7. Text2Img task_2-translation_tool.json⮕導入翻譯節點 | 要先下載節點在創檔案 -下載節點: “ComfyUI_Custom_Nodes_AlekPet”->請參考置頂FQ&A -節點:Argos Translate Text Node -Connecting |
| 8. Text2Img task_3-prompt_style_import.json ⮕導入風格提示詞 | -下載檔案:”style.csv”並移動到目標資料夾(ComfyUI)@@@@@改成使用拖曳的 -下載節點: “ComfyUI-Styles_CSV_Loader”->請參考置頂FQ&A -節點:Load Style CSV -節點:條件連接(concat) -Connecting |
| 9. Homework | -創造一個合併風格的成果,並在下一堂課分享你的創意 |
| 10. ❗關閉RunPod | -請參考置頂FQ&A |
0. ❗開啟RunPod
請參考置頂FQ&A
1. 補充知識
程式碼開源、閉源?

開源(Open-source):
開源(Open-source)指的是開放原始碼的軟體或專案,允許任何人查看、修改和分發其程式碼,通常遵循特定的開源授權條款。

閉源(Closed source):
閉源(Closed-source)指的是不公開原始碼的軟體,只有開發者或授權方能查看、修改和分發程式碼。
License?

開源但不見得可以商用:
GPL(GNU General Public License) – 必須開源,修改後的程式也需遵循 GPL。
LGPL(Lesser General Public License) – 允許與封閉源代碼一起使用,但修改後的 LGPL 部分仍需開源。
MIT License – 允許自由使用、修改和分發,只需保留原始授權聲明。
Apache License 2.0 – 與 MIT 類似,但包含專利權聲明保護。
BSD License – 允許自由使用,通常有 2 條款、3 條款或 4 條款版本。
MPL(Mozilla Public License) – 允許開源與閉源混合,但修改後的 MPL 代碼仍需開源。
Proprietary(專有授權) – 閉源軟體,受開發商限制,不允許修改或自由分發。
2. Stable Diffusion 故事
Stability AI

創立 (2019):由 Emad Mostaque 創立,目標是推動開放且民主化的人工智慧發展。
突破 (2022):推出 Stable Diffusion,一款能根據文字生成高品質圖像的 AI 模型,成為開源 AI 領域的重要里程碑。
擴展 (2023-2024):除了圖像生成,還涉足音訊、影片、語言模型(如 StableLM)等領域,並獲得大量投資。
內部變動 (2024):公司經歷領導層變動,創辦人 Emad Mostaque 辭職,引發關於公司未來發展方向的討論。
Stable Diffusion時間軸

- 2022 年 8 月:Stable Diffusion 1 首次推出
- 2022 年 10 月初:Stable Diffusion 1.4 模型推出,但使用上仍然不便
- 2022 年 10 月中:NovelAI 的動漫模型發生資料外洩,大幅提升了 Stable Diffusion 在動漫風格圖像生成方面的受歡迎程度
- 2022 年 10 月 20 日:Stable Diffusion 1.5 推出,是對 1.4 的一個適度改進 。至今仍在使用。許多 1.5 的動漫模型可能含有 NovelAI 的 DNA
- 2022 年 11 月中:出現了重要的模型 Anything V3,至今品質仍然不錯
- 2023 年 1 月至 3 月:出現了許多基於 Stable Diffusion 1 的微調模型 (fine-tunes) 和混合模型 (mixes),例如 Orange Mixes,專注於不同風格 (如真實系和動漫系)。
- 2022 年 11 月底:Stable Diffusion 2.0 發布,但並未受到歡迎
- 2023 年 7 月底:Stable Diffusion XL 1.0 正式發布,受到好評。它以 1024×1024 的圖片進行訓練,是當時最大的開放模型
- 2024 年 2 月:Stable Cascade 發布
- 2024 年 6 月:Stable Diffusion 3 發布
3. Stable Diffusion 原理
名詞解釋
- Latent space:
- 一個壓縮後的特徵空間,圖像是 64×64×4的張量(tensor)。
- 想像你要畫一幅畫,但不是直接畫,而是先用 草稿 記錄大致形狀,這個草稿是更精簡的表示方式。
- Gaussian noise:
- 一開始生成的 latent tensor 其實是一張 完全隨機的雜訊,符合標準高斯分布。
- 你的草稿紙上最開始只是亂七八糟的線條,看不出任何圖案(這些雜訊需要被逐步修正)。
- Unet(model):
- Stable Diffusion 的主要模型,它負責「逐步移除噪聲」,讓 latent tensor 變得更接近真實圖像。
- 這就像是一個老師在引導你改正草稿,每一步告訴你:「這裡的線條太亂了,應該這樣修改」。
- SD1.5 (latent space: 64x64x4)
- SDXL (latent space: 128x128x4)
- VAE decoder:
- 最後一個步驟,將 64×64×4 的 latent tensor 轉回 512×512×3 的實際圖像。
- 當你的草稿變得清晰後,你會正式上色、修細節,最後變成一張完整的畫。
Text2Img
1. 準備一個Latent space, 就像一個箱子裝著 “Latent image”

<——>

2. 將”Latent space” 和 “Text Prompt” 丟進去 “Unet” 預測出可能的 “Noise”

<——>

3. 經過2. 可以獲得一個新的 “New latent image”, 也就是 “Latent image” – “預測的noise”

<——>

重複 “2~3” 步驟, 取決於你設定的次數
4. 經過多次的去噪聲, 經過 “VAE decoder” 將原來小張的 “Latent image” 轉換成我們指定大小的圖片

<——>


5. 經過 VAE encoder in ComfyUI (by totally 20 steps)

->

->

->

->

4. Text2Img文生圖
ComfyUI工作流
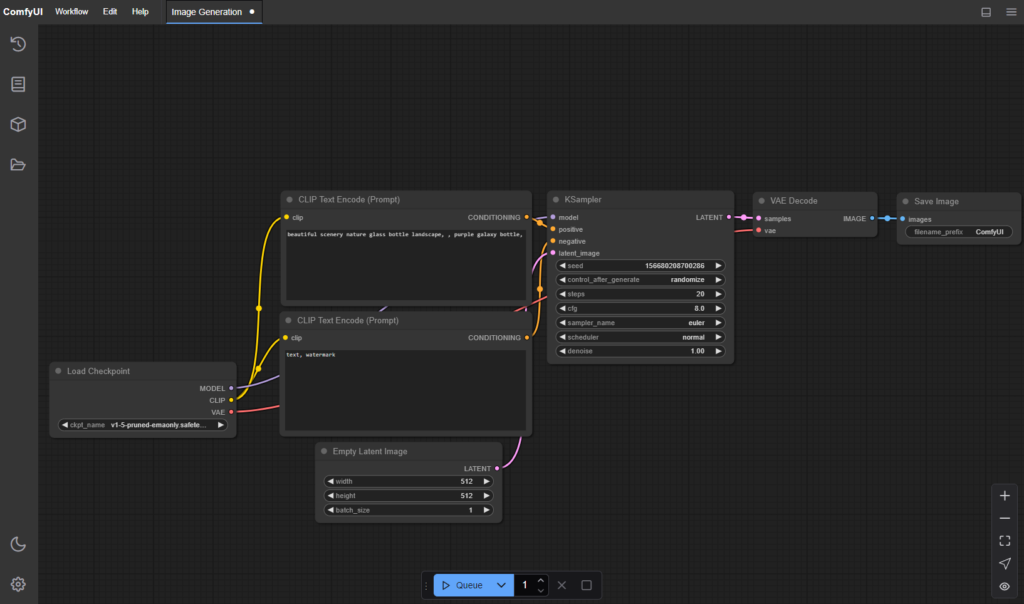
ComfyUI:
https://github.com/comfyanonymous/ComfyUI
ComfyUI 是由開發者 comfyanonymous 創立的開源節點式圖形使用者介面,專為 Stable Diffusion 等擴散模型設計,讓使用者能夠透過視覺化的節點連接,建立生成圖像、影片或音訊的工作流程,無需編寫程式碼。
工作流(workflow):
如同要做一件事情的流程,可以很複雜也可以很簡單,但有些必要的過程必須滿足
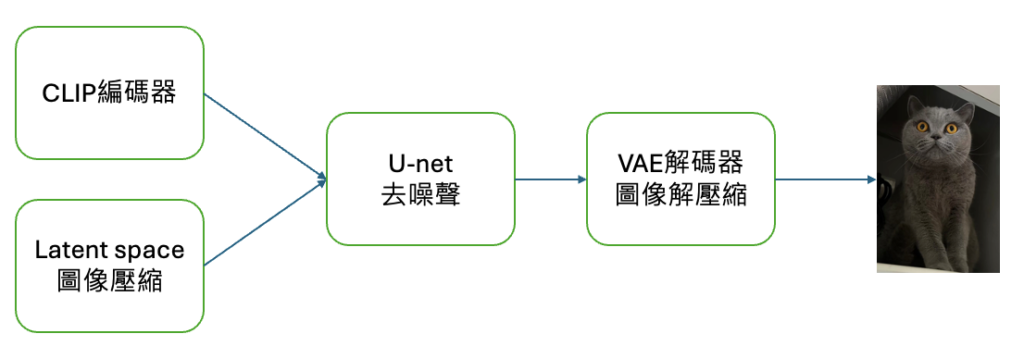
常用節點(Node)

Note:
筆記用,不會影響整個工作流(workflow)
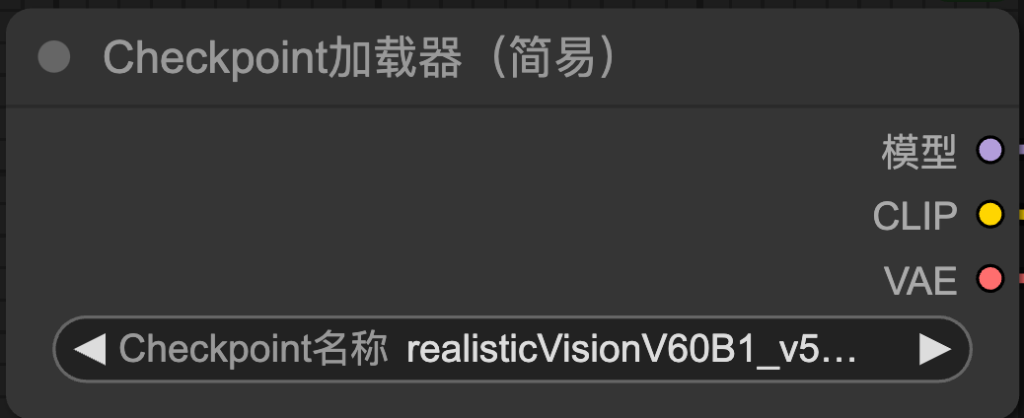
Checkpoint加載器(Checkpoint Loader):
就你最重要的模型,很多GB的那個

CLIP文本編碼(CLIP Text Encode):
非常重要的 “prompt”,有Positive也有Negative
翻譯成機器能聽得懂的語言
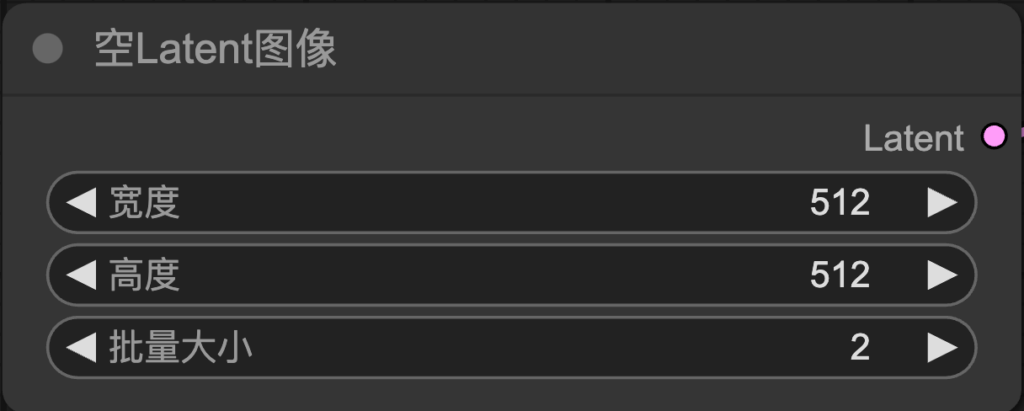
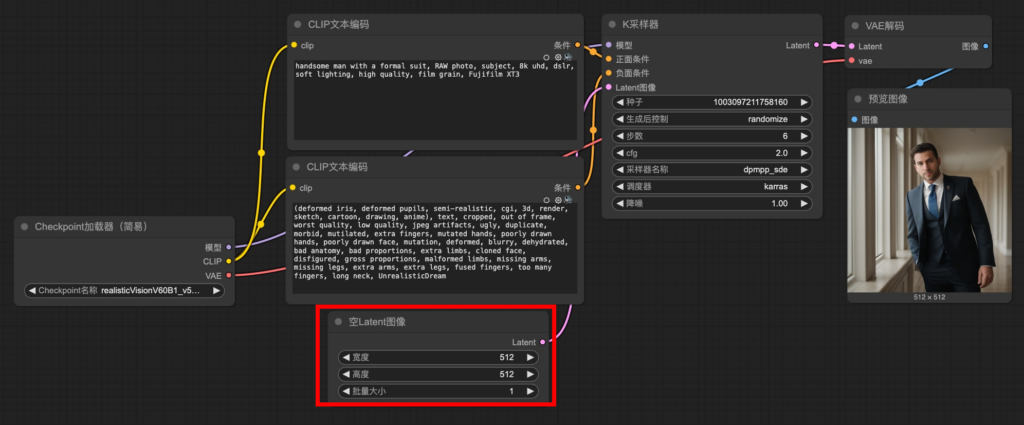
空Latent圖像(Empty Latent Image):
創建一個指定大小的 Latent 空間圖像作為生成的起始點
-寬度、高度->輸出圖片的解析度
-批量大小->一次輸出幾張圖片
-SD1.5(512~768之間)、SDXL(1024),因為訓練模型時的訓練素材

K採樣器(K-Sampler):
負責運行 Stable Diffusion 的採樣過程
-種子->控制圖像的隨機性
-生成後控制->控制種子變化
-步數->降噪次數
-cfg->和關鍵詞的相關性,盡量2~9,過高沒意義,物極必反
-採樣器名稱->決定 Stable Diffusion 如何應用降噪來逐步生成圖像
-調度器->降噪的方式normal:使用線性降噪方式,噪聲以均勻速度逐步減少。karras:採用曲線降噪策略,初期降噪速度較慢,中段加快,接近結尾時再次變慢,降噪變化更平滑自然。exponential:呈指數型降噪,初期變化緩慢,隨後迅速加速完成大部分降噪過程。
-降噪->文生圖寫1即可、圖生圖(值越高和原圖越不相近)

VAE解碼(VAE Decode):
-前面編碼後面解碼
-將 Latent 空間中的圖像解碼成可視化的圖像。
-需要加載 VAE 模型來執行轉換(部分vae由checkpoint模型提供)。

CLIP文本編碼(Clip Text Encode(Prompt)):
-人類給模型的正面或負面提示詞

保存圖像/預覽圖像:
-保存或預覽
修改ComfyUI語言
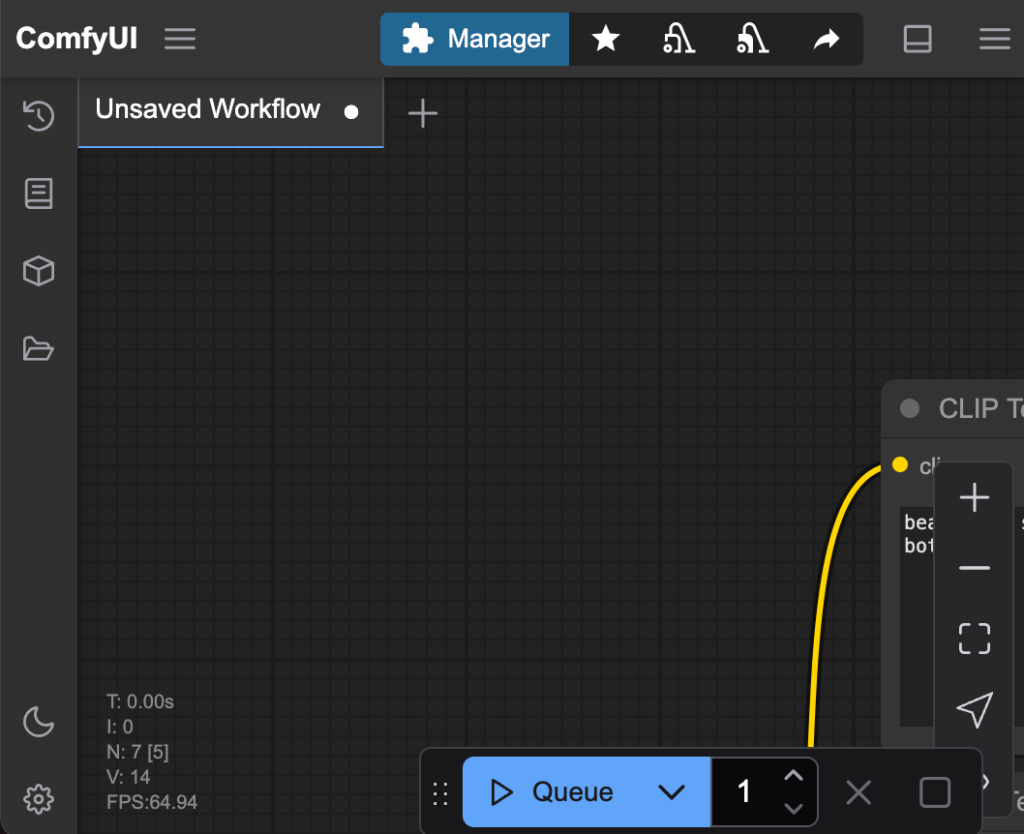
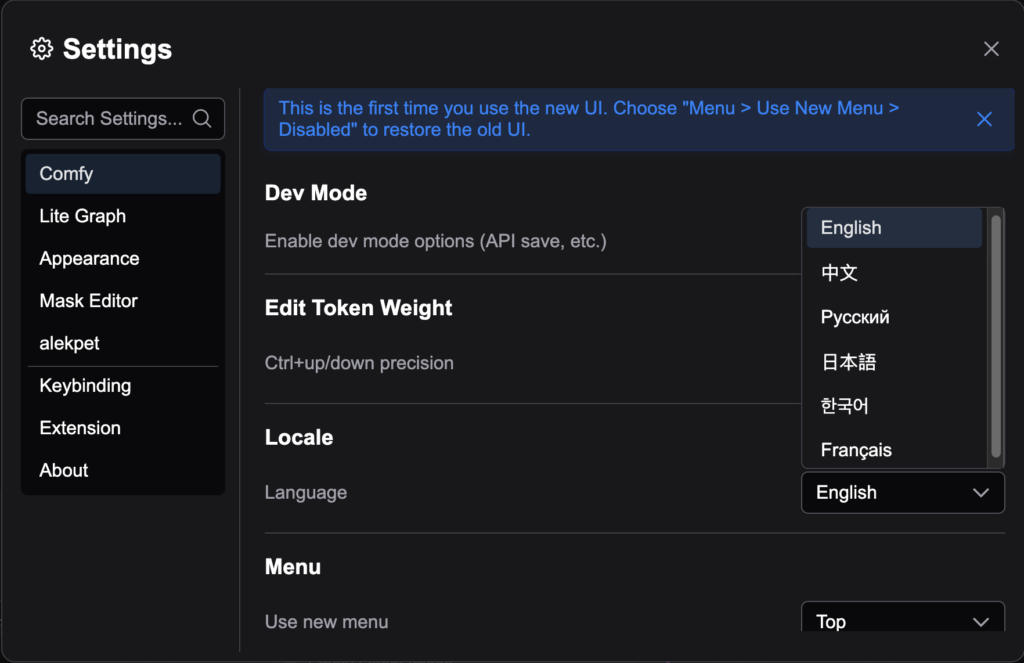
1. 點擊左下角”⚙️” 並 在Settings 的 Locale 更改 English 為 “中文”
->
5. task_1-basic_workflow_practice.json⮕從頭搭建工作流
Connecting
0. 創建一個空的workflow並命名”task_1-basic_workflow_practice”
1. 👍👍👍
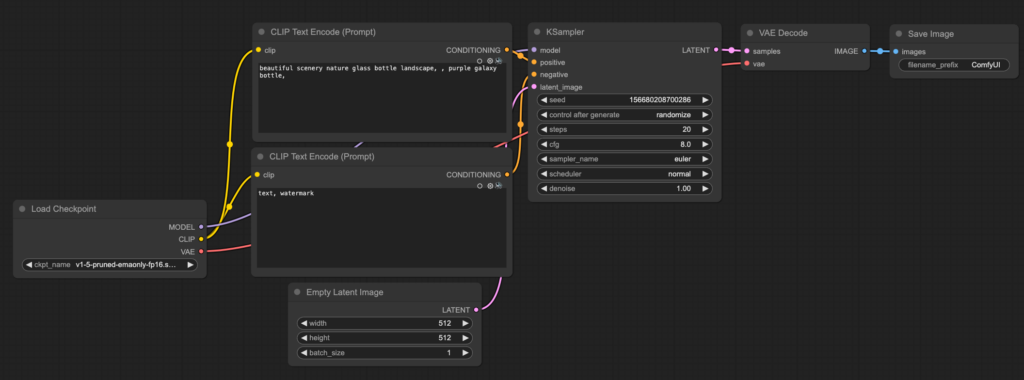
下載模型:”realisticVisionV60B1_v51VAE.safetensors”->請參考置頂FQ&A
6. 檔案資料夾導覽
1. 點擊workspace->點擊ComfyUI
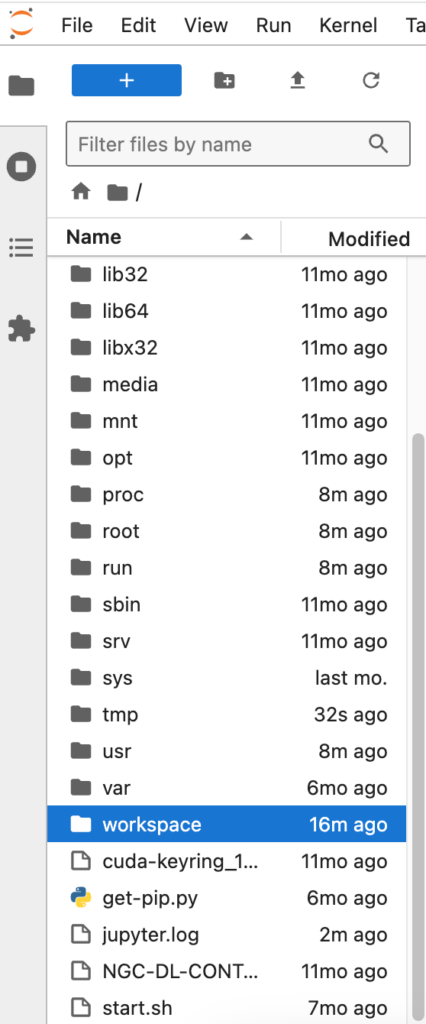

2. “/workspace/ComfyUI/” 是主要的所有檔案路徑
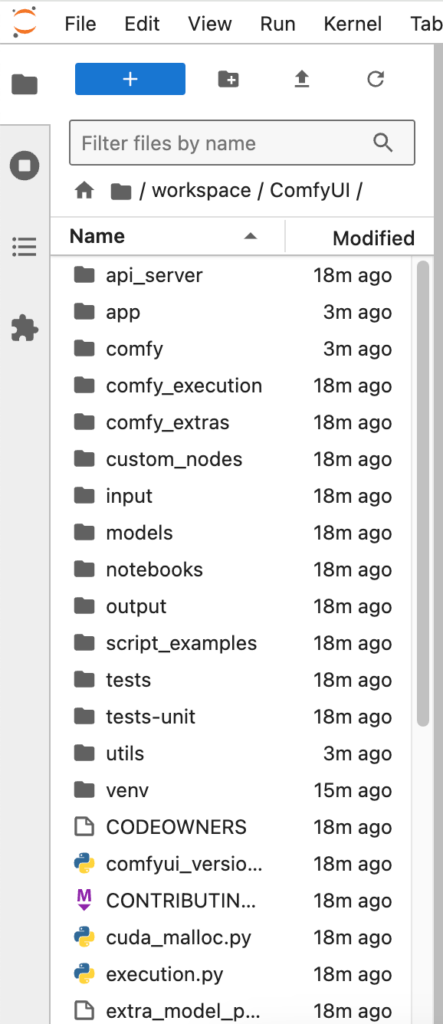
/workspace/ComfyUI/models->所有模型放置的地方
/workspace/ComfyUI/user/default/workflows->放置工作流的地方
1. 找到圖片輸出的資料夾 “/workspace/ComfyUI/output/”

->

2. 下載到你的電腦, 並分享到群組上!!!

7. task_2-translation_tool.json⮕導入翻譯節點
下載節點: “ComfyUI_Custom_Nodes_AlekPet”->請參考置頂FQ&A
節點:Argos Translate Text Node
Connecting
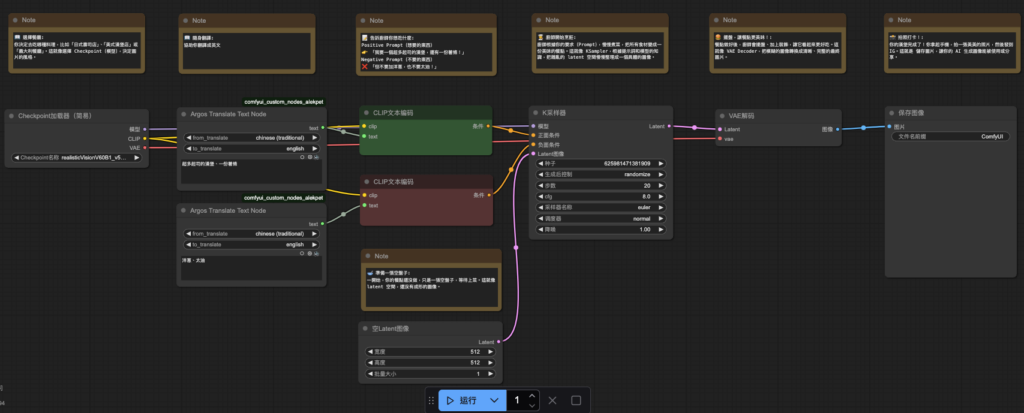
YOU GOT IT

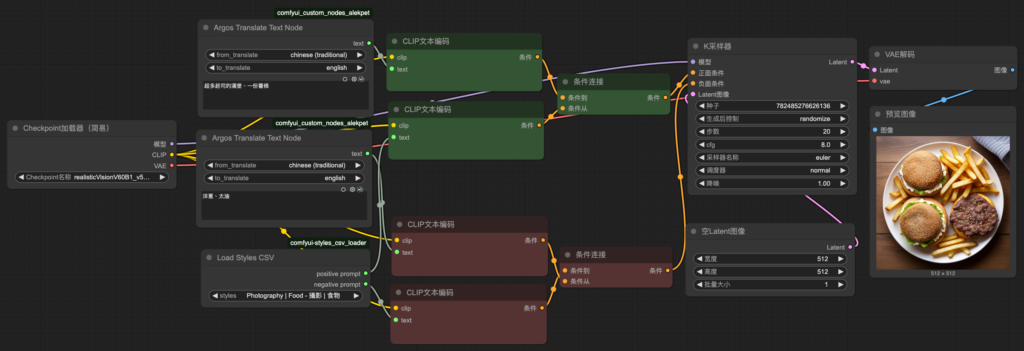
8. task_3-prompt_style_import.json ⮕導入風格提示詞
下載檔案:”style.csv”並移動到目標資料夾(ComfyUI)
1. 進入到Frank的github-https://github.com/frankpeng1218/Comfyui_AI_from_0_2025course 並 點擊 “prompt_style”

2. 點擊 “styles.csv”

3. 點擊 “Raw”

4. 複製該連結

5. 開啟RunPod 的 Terminal 輸入 “cd”

6. 輸入剛剛複製的連結-> “wget https://raw.githubusercontent.com/frankpeng1218/Comfyui_AI_from_0_2025course/refs/heads/main/prompt_style/styles.csv“

7. 輸入 “ls -l | grep “stylefks.csv” ” 或 “ls” 來檢查是否有成功下載

下載節點: “ComfyUI-Styles_CSV_Loader”->請參考置頂FQ&A
節點:Load Style CSV
節點:條件連接(concat)
Connecting
9. Homework
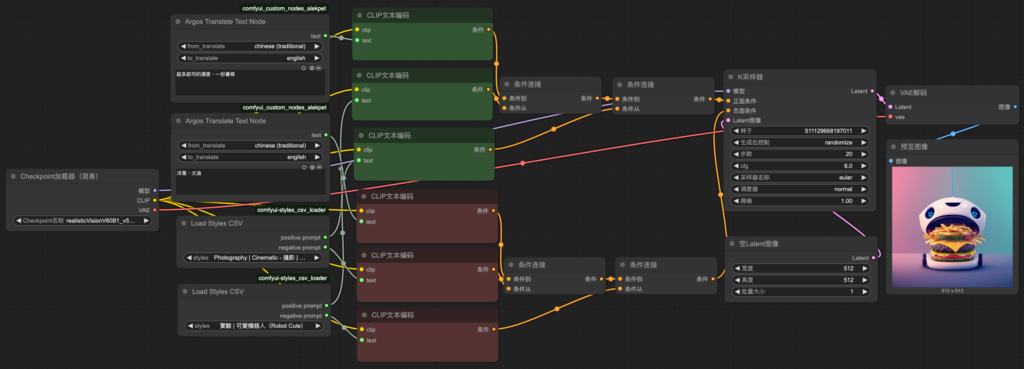
創造一個合併風格的成果,並在下一堂課分享你的創意
作業參考
10. 關閉RunPod❗
請參考置頂FQ&A
Lesson_03
授課大綱:
| 課程內容 | 項目 |
|---|---|
| 0. ❗開啟RunPod | -請參考置頂FQ&A |
| 1. 補充知識 | -電腦組成元件 -CPU and GPU in RunPod |
| 2. 作業分享 | |
| 3. Text2Img task_4-img_quality_improvement.json⮕影像優化 | -下載模型: “4x-AnimeSharp”, “4x-UltraSharp”, “RealESRGAN x4”->請參考置頂FQ&A -下載節點: “rgthree-comfy”->請參考置頂FQ&A -節點:加載放大圖像模型/使用模型放大圖像 -節點:圖像對比(Image Comparater)rgthree -Connecting |
| 4. Text2Img task_5-simply_workflow.json⮕排版優化 | -Connecting-轉換為組節點 |
| 5. Img2Img圖生圖 | -text2img vs img2img |
| 6. Img2Img task_6-img2img_template.json⮕img2img模板練習 | -Connecting |
| 7. Img2Img task_7-img2img_parameter_tuning.json⮕img2img參數調整 | -Connecting 同task_6 -參數調整:seed、cfg、降噪 -節點:縮放圖像 -節點:圖像對比(Image Comparater)rgthree -下載節點: “ComfyUI-Custom-Scripts”->請參考置頂FQ&A -節點:播放聲音(PlaySound) |
| 8. Controlnet | -發現和原圖一點關係都沒有所以才要controlnet -注意要版本SD or SDXL要和大模型一致 -控制性很強 -增加應用Controlnet、加載Controlnet模型、preprocessor |
| 9. Img2Img task_8-img2img_controlnet_template.json⮕Controlnet練習 | 下載model: -下載model EasyNegative -Connecting -下載model:”ControlNet-v1-1 (openpose; fp16)“ |
| 10. Img2Img task_9-img2img_controlnet_openpose.json⮕Controlnet參數調整 | -Connecting 同task_8 -參數調整:強度、開始/結束百分比 -參數調整:openpose |
| 11. Homework | -嘗試調整不同的Openopse參數生成不同的照片 |
| 12. ❗關閉RunPod | -請參考置頂FQ&A |
0. ❗開啟RunPod
請參考置頂FQ&A
1. 補充知識
電腦組成元件
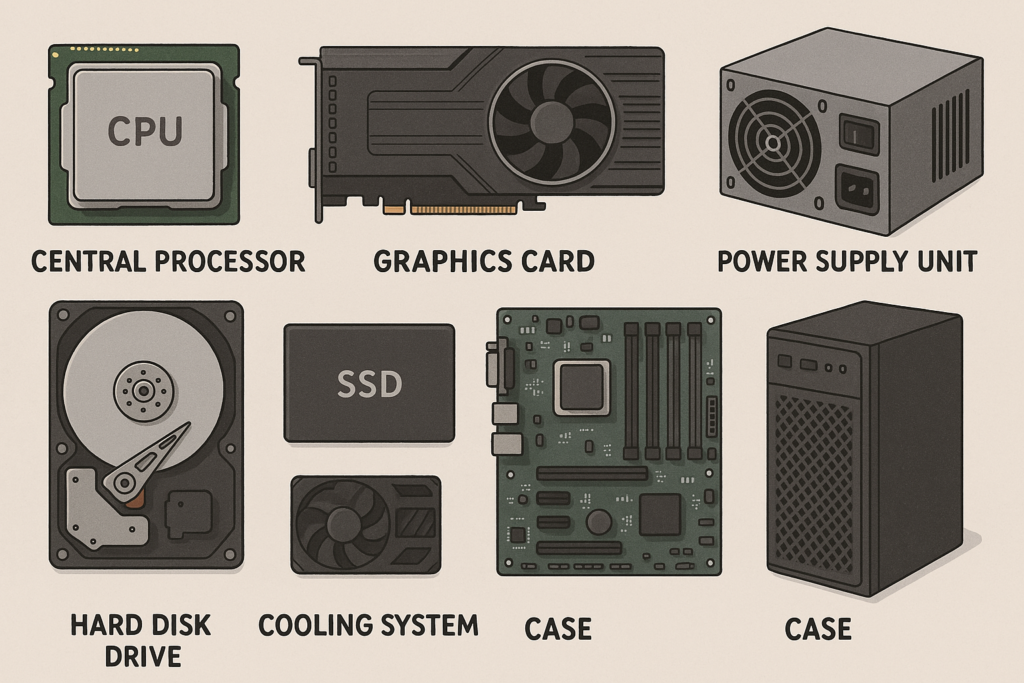
1. 中央處理器(CPU, Central Processing Unit)
功能:就像電腦的大腦,負責執行所有的指令和計算。
2. 記憶體(RAM, Random Access Memory)
功能:暫時儲存正在執行的程式和資料,速度快,但關機就會清除。
3. 儲存裝置硬碟(HDD or SSD):
功能:永久儲存作業系統、應用程式和檔案。
4. 顯示卡(GPU, Graphics Processing Unit)
功能:處理圖形和影像,玩遊戲、繪圖或影片剪輯時特別重要。
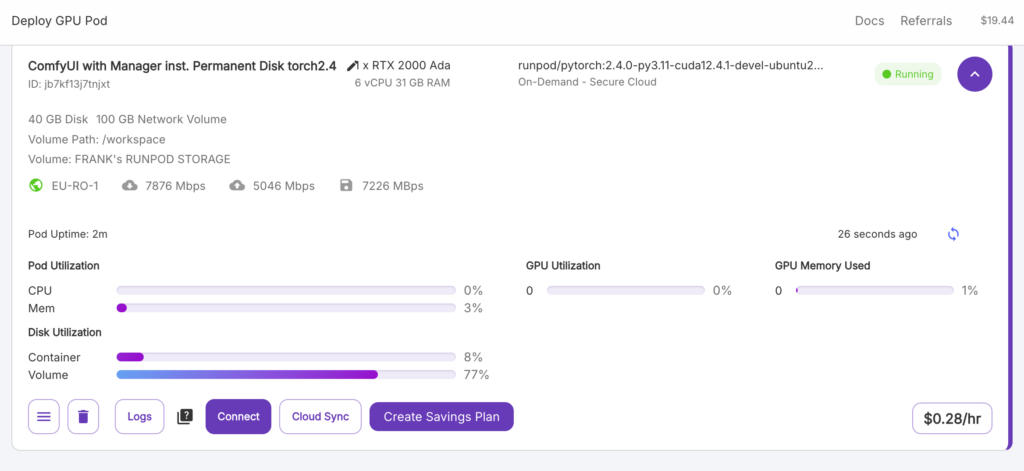
CPU and GPU in RunPod
2. 作業分享
程式碼開源、閉源?
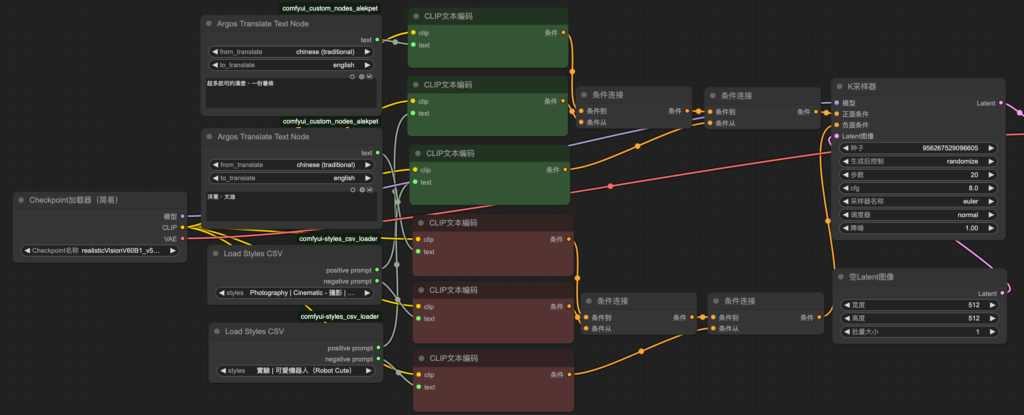
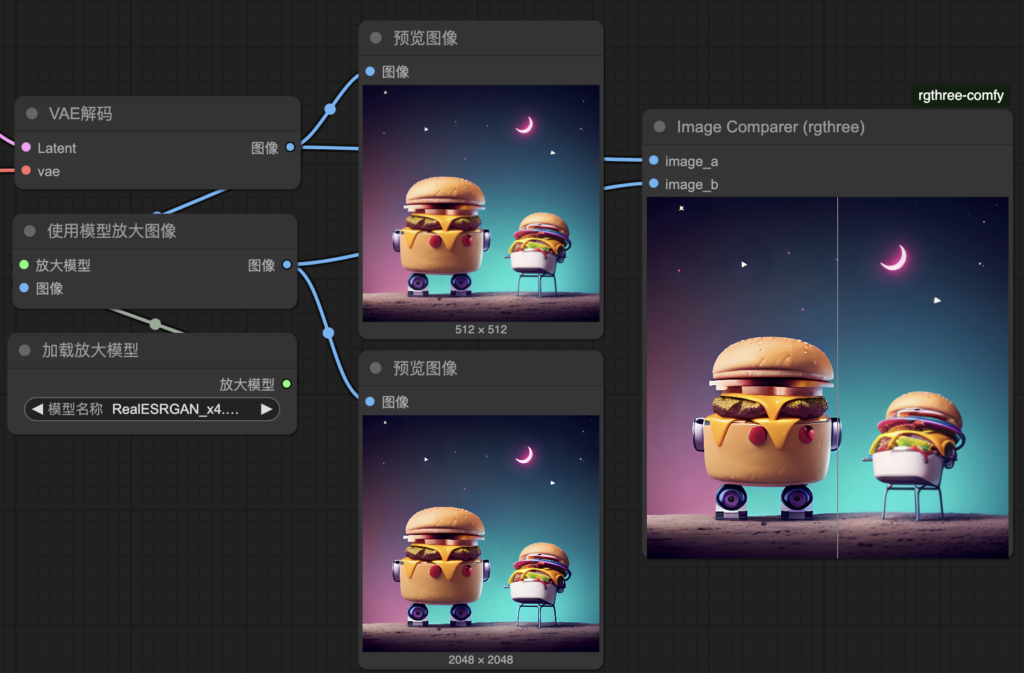
3. task_4-img_quality_improvement.json⮕影像優化
下載模型: “4x-AnimeSharp”, “4x-UltraSharp”, “RealESRGAN x4”->請參考置頂FQ&A
下載節點: “rgthree-comfy”->請參考置頂FQ&A
節點:加載放大圖像模型/使用模型放大圖像
節點:圖像對比(Image Comparater)rgthree
Connecting
4. task_5-simply_workflow.json⮕排版優化
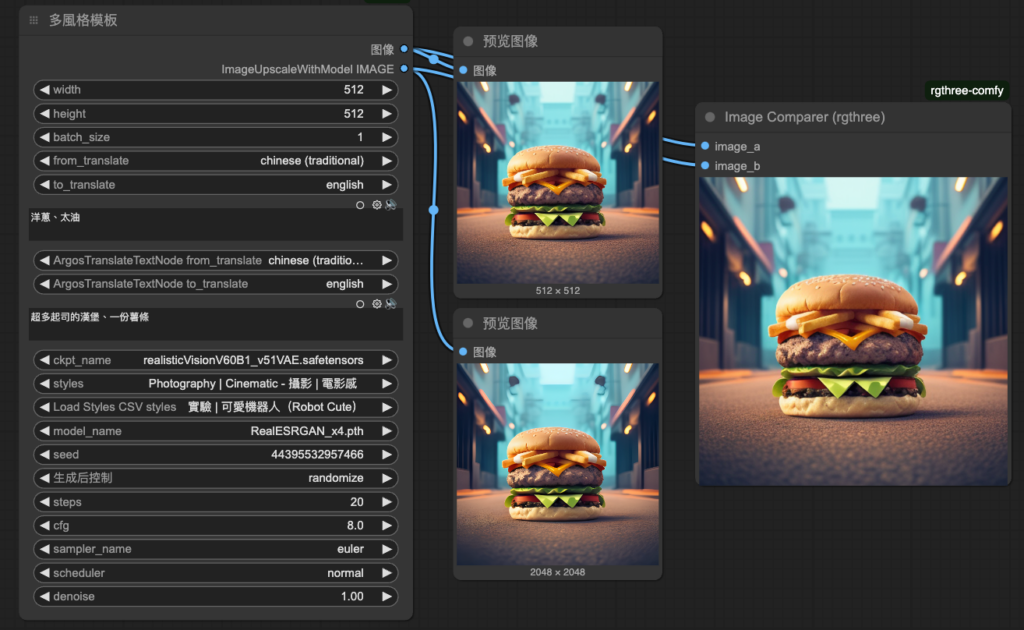
Connecting-轉換為組節點
1. 需要的節點選取並右鍵點擊 “轉換為組節點”
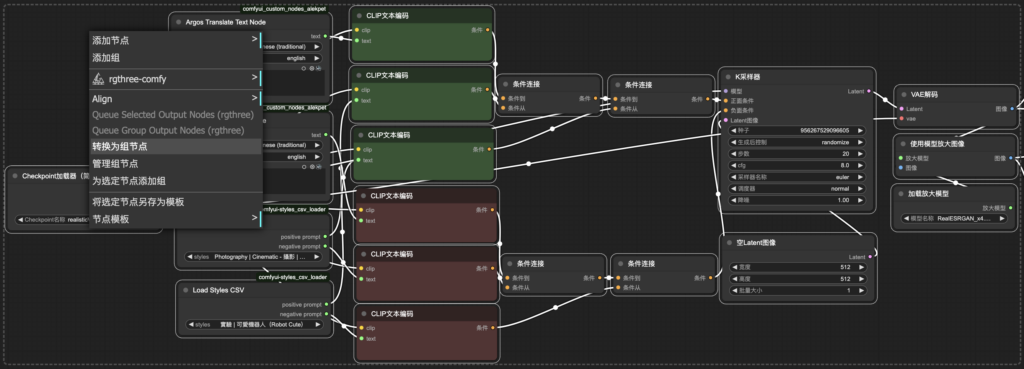
2. 輸入名稱並點擊 “確認”

3. 👍👍👍
5. Img2Img圖生圖
Text2Img vs Img2Img
Text2Img 基本工作流
Img2Img 基本工作流
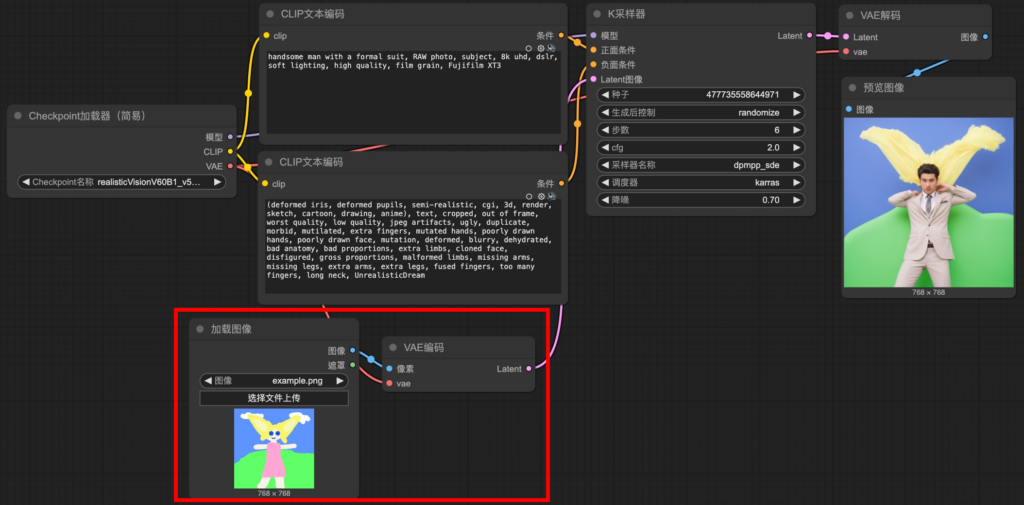
Text2Img vs Img2Img->需要額外加載圖像以及VAE編碼器(將像素轉變成Latent),因為輸入到KSampler的圖片必須是”Latent Image”
6. task_6-img2img_template.json⮕img2img模板練習
Connecting
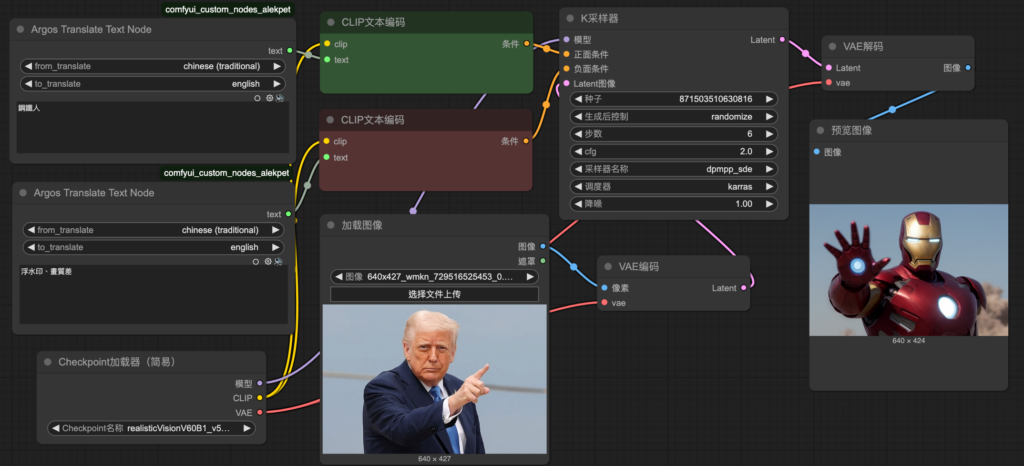
7. task_7-img2img_parameter_tuning.json⮕img2img參數調整
Connecting

參數調整:seed、cfg、降噪
固定Seed->生成後都會是固定(相似)的圖

->

固定Seed & 修改cfg->高cfg可讓圖片更貼合prompt,反之低cfg讓AI更自由發揮。注意物極必反。

修改cfg 2->8

固定Seed & 固定cfg & 修改降噪->高降噪AI低依賴原圖,反之高降噪讓AI高依賴原圖。範圍0~1。

修改降噪 1->0.7

節點:縮放圖像
裁減改成”center”才會是正確比例

使用512×512生成後的圖形會比較好,因為本身模型就是使用512×512訓練的

縮放圖像至512×512->

Img2Img->

節點:圖像對比(Image Comparater)rgthree
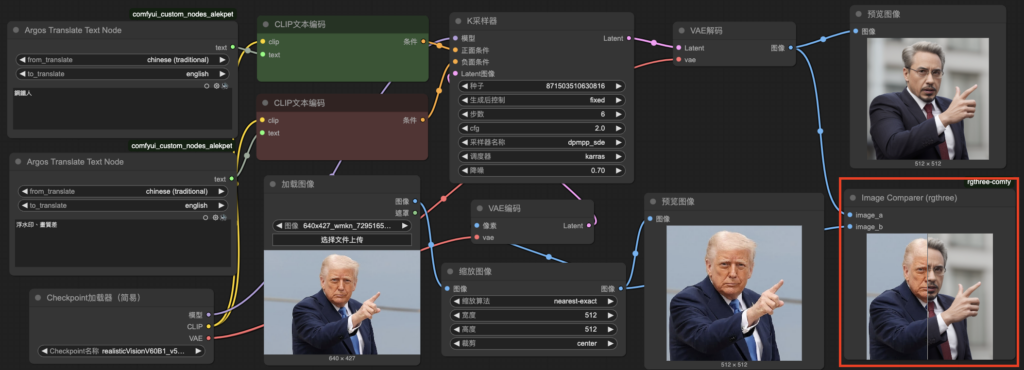
下載節點: “ComfyUI-Custom-Scripts”->請參考置頂FQ&A
節點:播放聲音(PlaySound)
mp3參考下載連結:https://memes.tw/sound, 將mp3檔案放置到”/Workspace/ComfyUI/custom_nodes/comfyui-custom-scripts/web/js/asset”
做完某點時,可以播放聲音,例如以下:當生成圖片時就會播放”回答我.mp3″

8. Controlnet
強度:對整張照片影響程度,要讓這張圖片的發展空間更高,就調低,反之發展空間低就調高
開始百分比
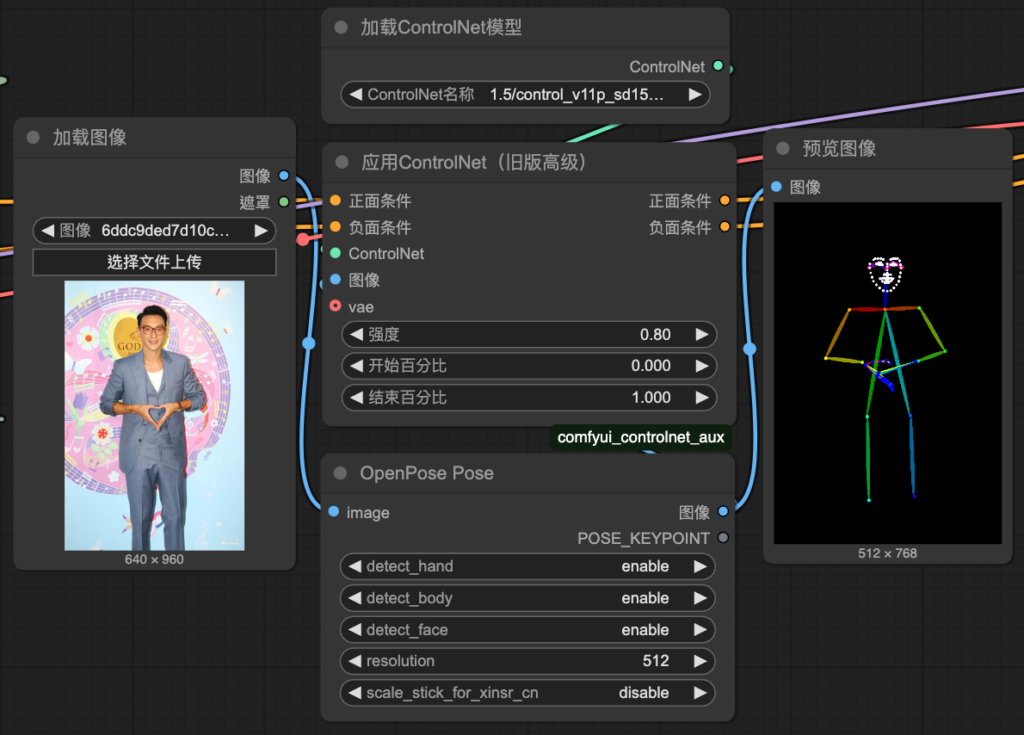
9. task_8-img2img_controlnet_template.json⮕Controlnet練習
Connecting
要先下載,要下載很久要下載節點comfyui_controlnet_aux@@@@
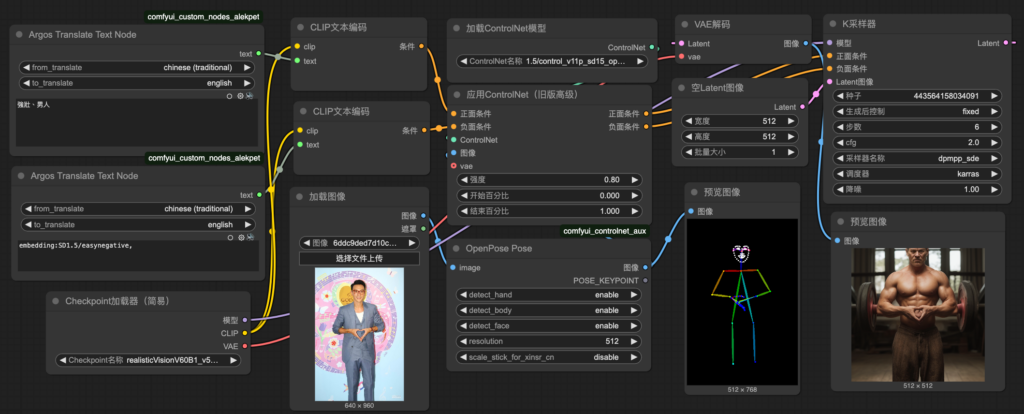
10. task_9-img2img_controlnet_openpose.json⮕Controlnet參數調整
參數調整:強度、開始/結束百分比
強度:對整張照片影響程度,要讓這張圖片的發展空間更高,就調低,反之發展空間低就調高
開始/結束百分比:在什麼時間下介入圖片生成


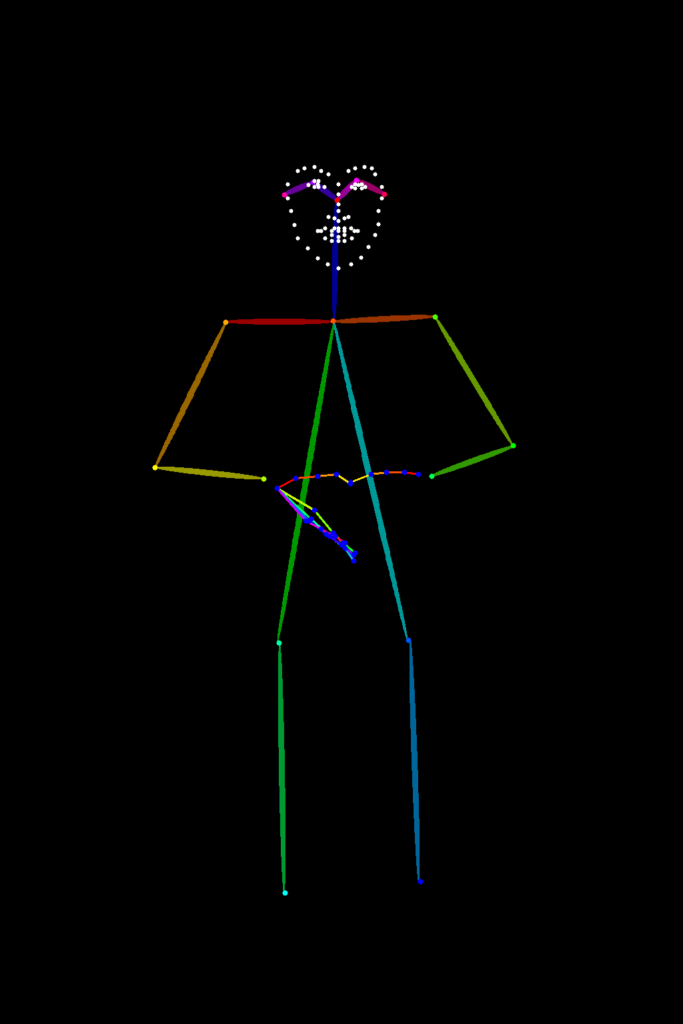
參數調整:Openpose




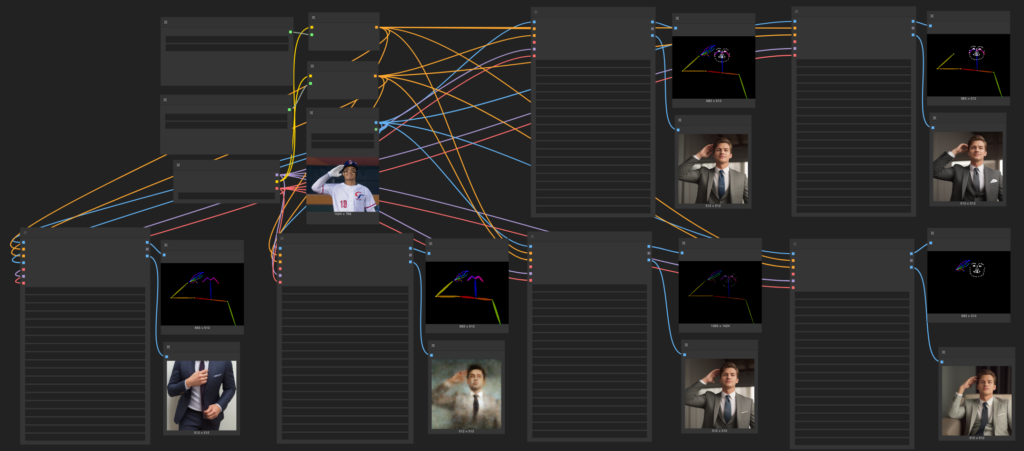
11. Homework
嘗試調整不同的Openopse參數生成不同的照片
單一輸出
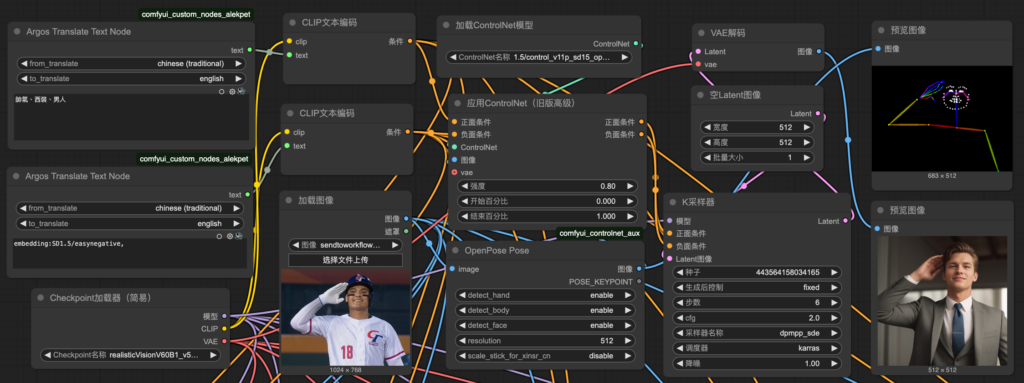
進階:Convert to group 多輸出
12. ❗關閉RunPod
請參考置頂FQ&A
Lesson_04
時間規劃:
授課大綱:Img to Img
| 課程內容 | 項目 |
|---|---|
| 0. ❗開啟RunPod | -請參考置頂FQ&A |
| 1. 補充知識 | |
| 2. 作業分享 | |
| 3. Img2Img task_10-img2img_controlnet_lineart.json | -下載模型: “ControlNet-v1-1 (lineart; fp16)“->請參考置頂FQ&A -Connecting 同task_8 -節點:Realistic Lineart |
| 4. Img2Img task_11-img2img_controlnet_multi.json | -Connecting 同task_10 -lineart, openpose 用成組 -節點:縮放圖像 -合併多個controlnet |
| 5. Img2Img task_12-img2img_controlnet_pose_node.json | -Connecting 同task_11-controlnet_openpose -節點:Pose Node |
| 6. IPAdapter | |
| 5. inpaint | |
| -SDXL1.0 | |
| 6. 合併model-ModelMerge | |
| FLUX | 從0搭建 -FLUX.1-dev 不支持商用(FP8和FP16基本差不多) -FLUX.1-schnell(Apache2.0) 4 步生圖 -FLUX.1-vae (必要) -要下載到Unet根目錄 |
| 1. SDXL原理 | -SDXL1.0 |
| 2. project_5 | -SDXL 練習 |
| 3. ControlNet原理 | -ControlNet Preprocessor -AIO Aux Preprocessor -加載ControlNet模型 |
| 4. project_5 | -ControlNet practice |
| 5. project_6 | -SDXL1.0 |
| 6. 關閉RunPod |
0. ❗開啟RunPod
請參考置頂FQ&A
1. 補充知識
請參考置頂FQ&A
2. 作業分享
請參考置頂FQ&A
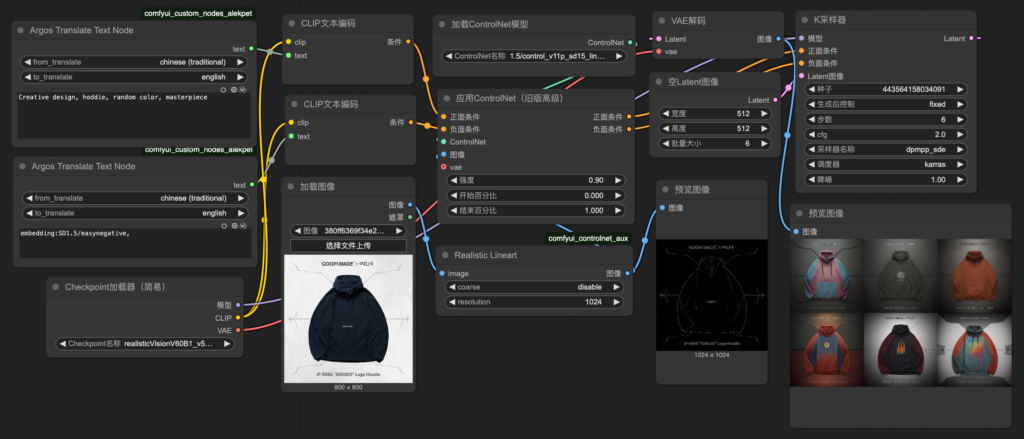
3. task_10-img2img_controlnet_lineart
下載模型: “ControlNet-v1-1 (lineart; fp16)“->請參考置頂FQ&A
Connecting 同task_8
節點:Realistic Lineart
4. task_11-img2img_controlnet_multi
Connecting 同task_10
lineart, openpose 用成組
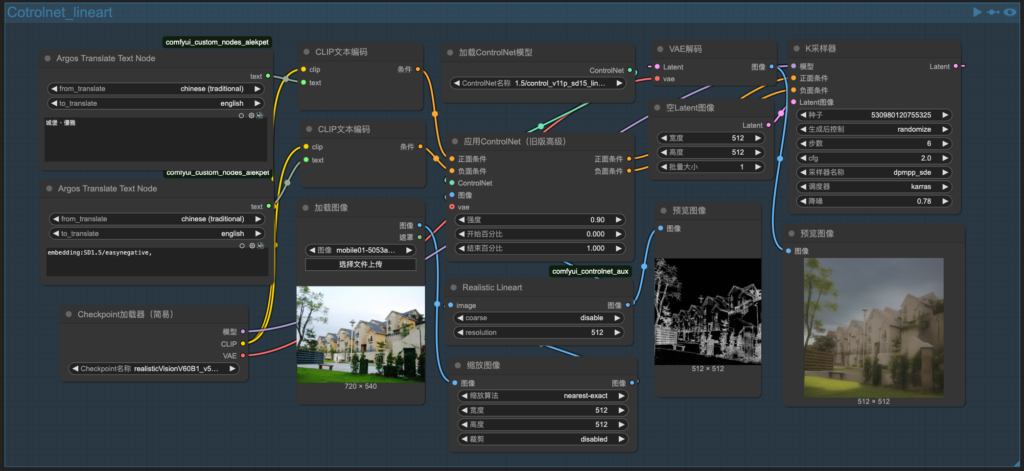
執行、bypass

節點:縮放圖像
目前使用的SD1.5建議使用512×512,因為模型訓練的圖片為512×512

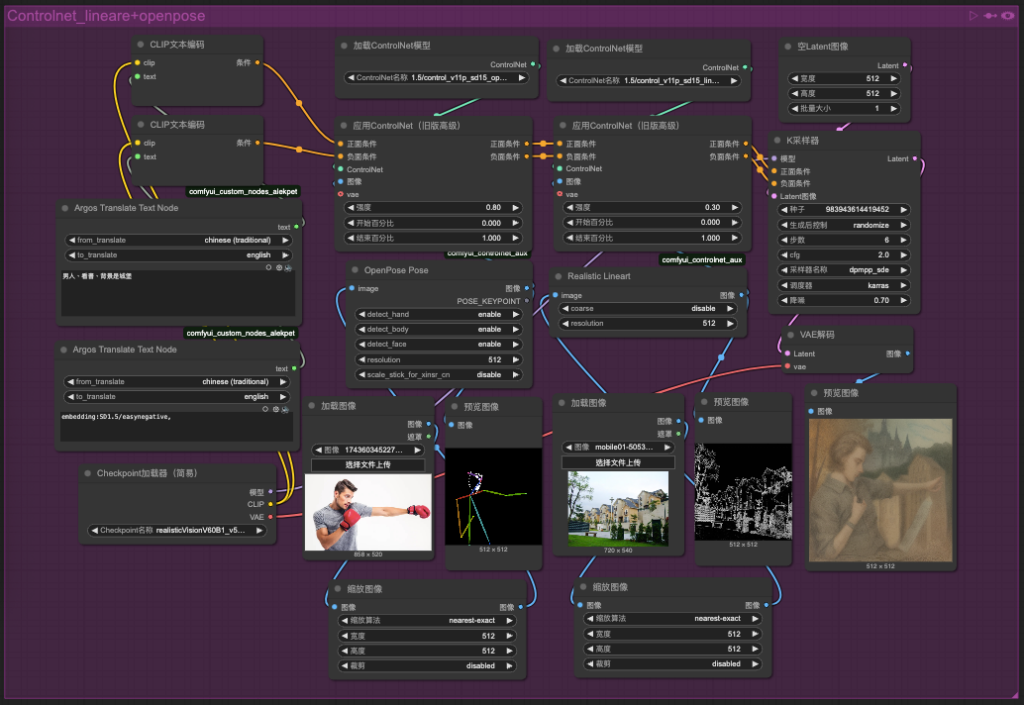
合併多個controlnet
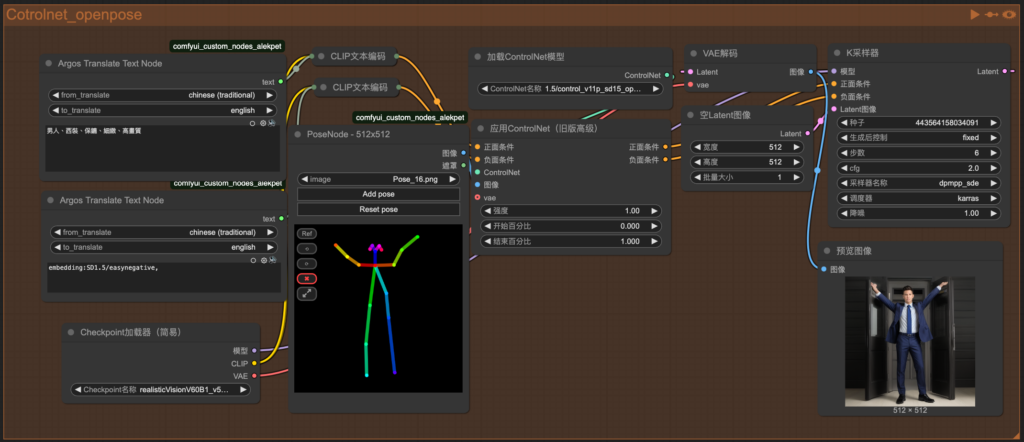
5. task_12-img2img_controlnet_pose_node
Connecting 同task_11-controlnet_openpose
節點:Pose Node
Lesson_05
時間規劃:
| 時間 | 項目 |
|---|---|
| 9:30~9:40 | 老師講幹話(科技講座) |
| 9:40~11:00 | 老師折磨學生 |
| 11:00~11:15 | 老師吃早餐 |
| 11:15~12:30 | 老師欺負學生 |
授課大綱:Img to Img
| 課程內容 | 項目 |
|---|---|
| 1. project_7 | -IMG2IMG -Image Resize -WD14 Tagger(獲得image to text) -Strig Function(結合) |
| 2. project_8 | -Mask換臉-微調 |
| 3. project_9 | -合併model |
| 4. Lora 原理 | – |
| 5. project_10 | -訓練自己的Lora model –https://www.youtube.com/watch?v=ksUEu6c-ouc |
| 6. project_11 | -Try your lora |
| 7. project_12 | -Play with different Lora |
| 8. 關閉RunPod |
Lesson_06
時間規劃:
| 時間 | 項目 |
|---|---|
| 9:30~9:40 | 老師講幹話(科技講座) |
| 9:40~11:00 | 老師折磨學生 |
| 11:00~11:15 | 老師吃早餐 |
| 11:15~12:30 | 老師欺負學生 |
授課大綱:Text/Img, Img/Img
Lesson_07
時間規劃:
| 時間 | 項目 |
|---|---|
| 9:30~9:40 | 老師講幹話(科技講座) |
| 9:40~11:00 | 老師折磨學生 |
| 11:00~11:15 | 老師吃早餐 |
| 11:15~12:30 | 老師欺負學生 |
授課大綱:Img to Video
Lesson_08
時間規劃:
| 時間 | 項目 |
|---|---|
| 9:30~9:40 | 老師講幹話(科技講座) |
| 9:40~11:00 | 老師折磨學生 |
| 11:00~11:15 | 老師吃早餐 |
| 11:15~12:30 | 老師欺負學生 |
授課大綱:Img to Img
| 課程內容 | 項目 |
|---|---|
| 1.Project | – |
| 2. | – |
| 3. | – |
| 4. | – |
| 5. | – |
| 6. | – |
| 課程內容 | 項目 |
|---|---|
| 1. About ME, YOU | – |
| 2. 課程介紹/課程目標 | – |
| 3. | -Model/IPO |
| – | |
| – | |
| – | |
| – | |
| – |
使用wget下載model,
修改ComfyUI語言
1. 點擊左下角”⚙️”

2. 在Settings 的 Locale 更改 English 為 “中文”

預設工作流生成第一張AI繪圖
1. 重新整理ComfyUI頁面

1. 修改”Checkpoint加載器” 的model 為 “realisticVisionV60B1_v51VAE.safetensors” & 點擊”執行”
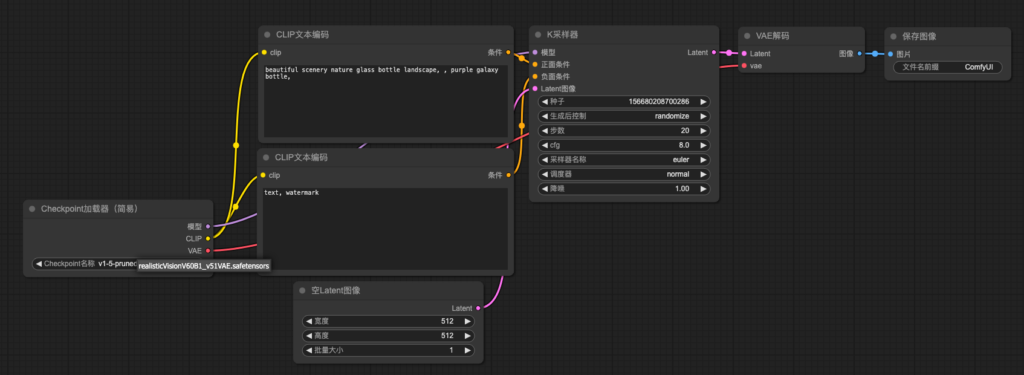
2. YOT GOT IT!

儲存工作流(workflow)
1. 點擊 “工作流” 後 “保存”

2. 儲存名為”task_0-first_attempt” 後 “確認”

GITHUB 下載工作流
下載Frank工作流
Method 1: 手動移動.json檔案
1. 進入連結https://github.com/frankpeng1218/Comfyui_AI_from_0_2025course
2. 點擊 “workflows”

3. 點擊目標.json檔案 “task_1-translation_tool.json”

4. 點擊 “下載的icon”

5. 拖曳移動到目標資料夾

->

->

->

->


———–>

Method 2: wget下載.json檔案
1. 進入連結https://github.com/frankpeng1218/Comfyui_AI_from_0_2025course
2. 點擊 “workflows”

3. 點擊目標.json檔案 “task_1-translation_tool.json”

4. 再點擊 “Raw”

4. 複製目標.json檔案的 “連結”

5. 在terminal 下輸入 “cd /workspace/ComfyUI/user/default/workflows” 後 “enter”

6. 在terminal 下輸入 “wget https://raw.githubusercontent.com/frankpeng1218/Comfyui_AI_from_0_2025course/refs/heads/main/workflows/task_1-translation_tool.json” 後 “enter”

7. 在terminal 下輸入 “ls” 後 “enter”, 可以檢查 “task_1-translation_tool.json” 是否成功下載

8. 會到ComfyUI 並重新整理, 點擊左邊工具列的 “工作流”並打開”task_1-translation_tool.json”

Backlog: Method 3: ComfyUI開啟下載檔案->此版本有bug
Method 3: ComfyUI開啟下載檔案->此版本有bug
1. 進入連結https://github.com/frankpeng1218/Comfyui_AI_from_0_2025course
2. 點擊 “workflows”

3. 點擊目標.json檔案 “task_1-translation_tool.json”

4. 點擊 “下載的icon”

5. 點擊 “打開”

6. 雙擊剛剛下載下來的檔案 “task_1-translation_tool.json”

下載/使用Argos翻譯節點
1. 點擊右上角 “Manager”

2. 點擊 “Custom Nodes Manager”
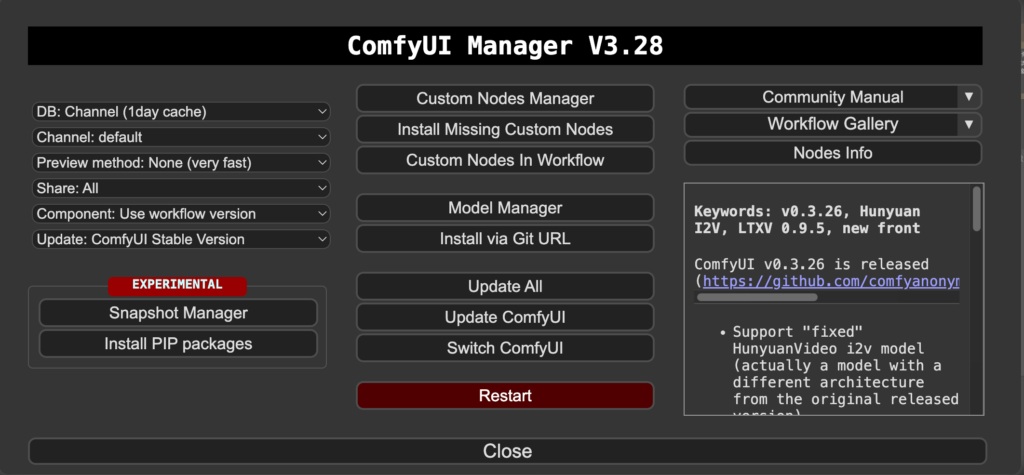
3. 輸入 “argos” 並點擊 ID34 “Install”
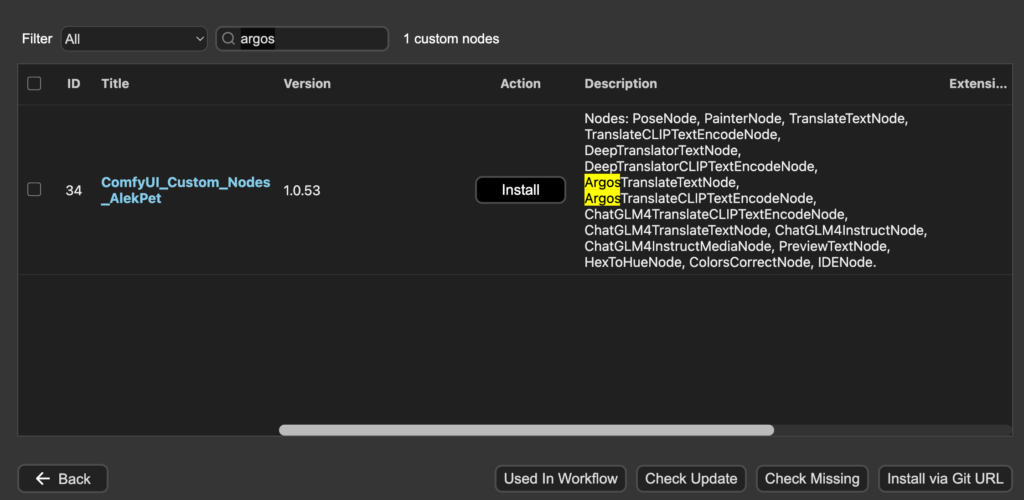
4. 選擇 “nightly” 並點擊 “Select”

5. 點擊 “Restart”
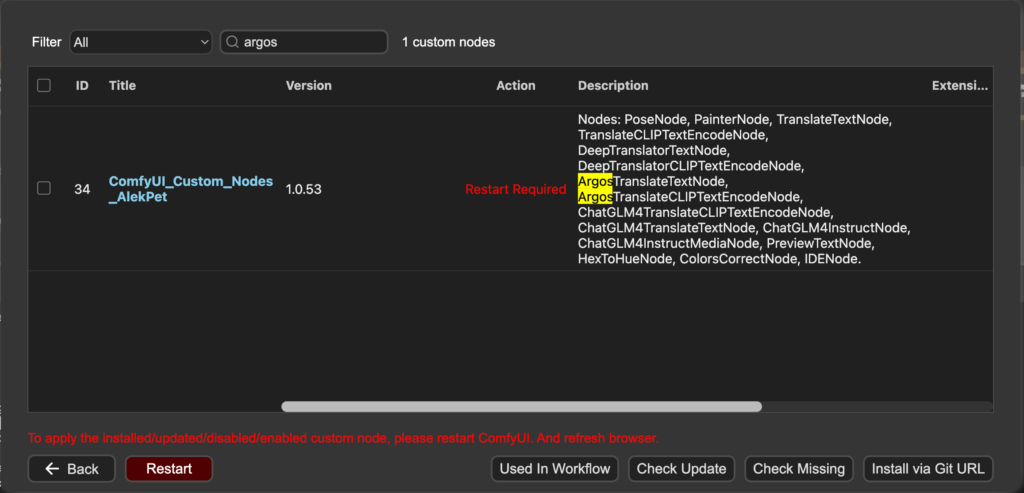
6. 點擊 “確認”

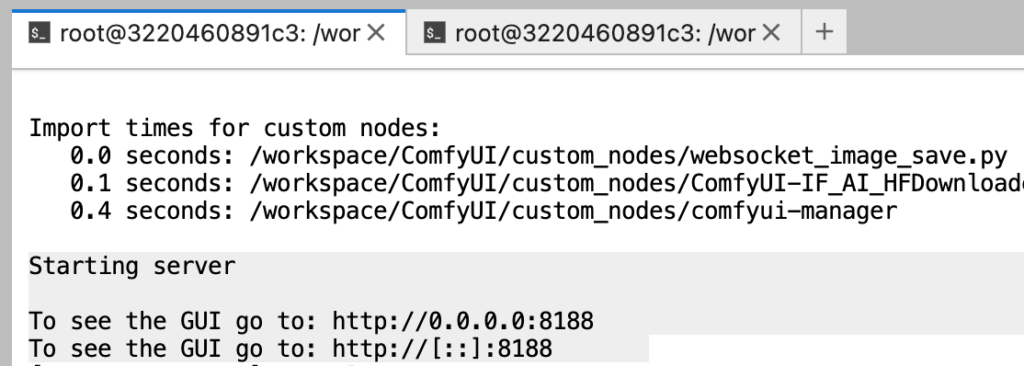
7. 等待ComfyUI server 重啟, 看到 “http://0.0.0.0:8188” 就代表重啟成功
8. 重新整理ComfyUI後, 開啟 “task_1-translation_tool.json” 並 “運行”

9. YOU GOT IT!

GITHUB下載style
下載style.csv並移動到目標資料夾(ComfyUI)
1. 進入到Frank的github-https://github.com/frankpeng1218/Comfyui_AI_from_0_2025course 並 點擊 “prompt_style”

2. 點擊 “styles.csv”

3. 點擊 “Raw”

4. 複製該連結

5. 開啟RunPod 的 Terminal 輸入 “cd”

6. 輸入剛剛複製的連結-> “wget https://raw.githubusercontent.com/frankpeng1218/Comfyui_AI_from_0_2025course/refs/heads/main/prompt_style/styles.csv“

7. 輸入 “ls -l | grep “stylefks.csv” ” 或 “ls” 來檢查是否有成功下載

下載node “ComfyUI-Styles_CSV_Loader”->請參考置頂FQ&A
1. 點擊 “Manager” 然後 “Custom Nodes Manager”

->

2. 搜尋 “ComfyUI-Styles_CSV” 並點擊 “Install” 後點擊 “Select”

->

3. 點擊 “Restart” 後點擊 “確認”, 重新啟動ComfyUI

->

Connecting-單一風格

Connecting–合併風格

節點:Efficieny node 和 easy use 可以未來再教:方便快速模組化節點(03-17)